-

- Forums
- Chatrooms
- Gallery
- Gameplay Videos
- Upload
- Articles
- Mod Reviews
- Shop SP: Games, Movies, Books
|
|
Black Raven Monastery | Underdark | Drider Lair | Z'hinda Citadel
Once again we have had to strike a deal in order to continue on our journey. At the request of the drow wizard Malavon, we have made our way to the lair of the driders - creatures part spider and part drow. For some reason - I cannot fathom what - the driders oppose the drows attempts for further expansion in this region of the Underdark. It is a tough bargain when you must side with the drow against their own, twisted progeny.
Alia Shield-Maiden, the Annals of Halgren
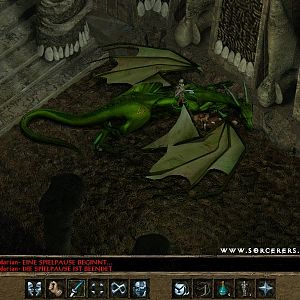
 The most straightforward way to enter this area is through the north entrance, placing you closest to Ginafae. Not far from where you enter the map you will find several driders. As mentioned by Sorn, the driders you encounter will include fighters, priestesses and wizards, usually together. As soon as you engage one in a fight, other driders in the area will join in the battle, along with a few that you probably didnt see. They arent nearly as tough as they look, including the Viciscamera Driders - youll learn more about these as you progress through the lair.
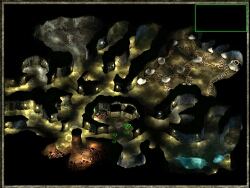
The drider lair is composed of several winding tunnels that weave throughout the map, along with side tunnels and dead ends. The driders themselves are mostly found waiting in small alcoves and dead end tunnels. Also be aware that traps have been laid along the tunnel floors; when triggered, they cause a small web to entangle the character.
From the north entrance, continue east along the tunnel. The second opening on the left leads to a large, circular chamber shrouded in a great web; a large statue stands in the middle of the chamber. Inside you will find Ginafae, the leader of the driders, and sister to Malavon Despana. Strangely, Ginafae does not attack you, even if you openly admit that youre here to destroy the device that creates the driders. If you havent already, you will learn that its called the Viciscamera - a device provided by the Legion of the Chimera and controlled by Imphraili the Transmuter. Ginafae isnt pleased about what is happening with the legion, but doesnt seem to think she can stop it; the Viciscamera driders are far more violent and bloodthirsty than normal driders, and are far more spider than drow. She will tell you a few more useful pieces of information, such as where you can find Imphraili, and where the Viciscamera is. You can also convince her to return to her brother, Malavon, although she is doubtful at first.
When youre finished speaking with Ginafae, head south to the central portion of the map. Youll encounter another group or two of driders, so travel carefully.
Imphraili the Transmuter
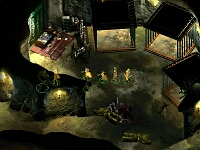 In the centre of the drider lair youll find a very strange chamber. Three cages are surrounded by enhanced flesh golems, and a human female moves distractedly about the chamber, occasionally pausing near an alchemy table. You probably don't want to have a paladin talk to her, as the paladin's blunt honesty about wanting to destroy the viciscamera doesn't leave many conversational options open. When you speak with her, you learn that this is indeed Imphraili. Unless you convince her otherwise, shes pretty certain that you shouldnt be here - but she doesnt have time or interest to do anything about it, so she just says to stay out of her way. If youre a good talker, you might be able to convince her that you have been sent by the legion to check on her progress, although you dont learn much more than by just talking to her. You can even go inside and rummage through her belongings - but she wont let you touch the alchemy table. On the tables you can find a Wand of Enfeeblement and a Wand of Bulls Strength. There are two books on the floor that prove quite interesting. One mentions several things about the viciscamera driders and the device that creates them, as well as how to use alchemy skills to create a potion that will destroy the viciscamera - although there is another way to destroy it, this is by far the easier way. The second book is about golems; specifically, how to create and activate the enhanced flesh golems.
After reading the books, it should become quite clear that in order to destroy whats creating driders, you need to get access to that alchemy table. Unfortunately, Imphraili wont let you do that - at least, not while she is alive. For most characters, there are no dialogue options that will provoke a fight with Imphraili; you will have to attack her, or one of the three driders in the cages. Although it may look like this is a straight forward battle, its actually quite difficult. Imphraili herself is a pushover, but you will also have to fight the three strange driders and two of the three flesh golems. Of the three driders, the Cradoldrider is the most dangerous; in addition to casting some rather potent spells, a host of surprisingly tough small spiders are released from its body when it dies.
When the fight is done, go and raid Imphrailis lab if you have not already done so. In addition to the two books, you will also find several reagents that can be used in creating magical potions. First, use the book and the reagents to create the potion that will destroy the Viciscamera. If you did manage to steal that White Wyrms egg outside of the Black Raven Monastery, you can use it to create two potions of frost giant strength. Finally, you can upgrade some of your healing potions to extra healing potions (up to about 10 potions). If you have a very high alchemy skill, you can also use the knowledge you gained from the book on flesh golems to activate the remaining Enhanced Flesh Golem! Give the golem one of the reagents (this is a dialogue option when you click on him). When the golem is brimming with life, cast any electrical based spell at it to activate it. The golem will now follow the character who activated him around the map and fight at his or her command. Although he's tough, he is mortal, and can be killed by the driders.
The Mind Flayers Blue Stone
To the east of Imphrailis lab is a large, open chamber in which youll find a number of driders, as well as some pools of molten webbing. Its quite a tough fight, as several more driders appear behind you in the middle of the battle. And, in the end, theres not much to gain here.
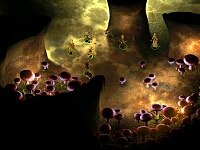 To the west of Imphrailis lab youll find a group of Myconids amidst a crop of giant mushrooms. There are only a few of the walking fungi, and they arent all that tough. They do, however, have the capability to stun your party members, as well as to cause confusion. If you search very carefully in the south-central portion of this area, youll find a blue stone - the same blue stone the Mind Flayer OinchackOlp asked you bring him. You may need to use the Alt key to find it.
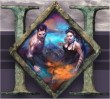
The Viciscamera
Now that you have created the potion in Imphrailis alchemy lab, head through the tunnels to the north-east corner of the map. You may still need to keep your eyes open for driders - they hide in the small nooks found throughout this map.
You will come to a very large chamber, throughout which are about a dozen cocoons. Each cocoon contains a Viciscamera Drider, and they do occasionally hatch. There are also several driders standing watch over the cocoons, so take care moving through here - unless you are using a thief to sneak through, you will have to fight them. In the far east corner is the Viciscamera Heart; an ugly, seething mass. Move up to it and speak to the monstrosity to toss the potion inside its gaping maw. All of the cocoons will be instantly destroyed, including the Viciscamera Heart. Any remaining driders, however, will not - and you may have to fight your way back out of the chamber. If you were unable to produce the special potion, you must destroy the Viciscamera Heart through brute force. This wont be very easy; the moment you attack it, not only do all the cocoons hatch, but any driders or other combatants left in the lair will come and join in the fight. It can take quite a beating too!
With your work in the drider lair complete, you can head back to the drow camp. Be careful on your way out of the caves; Sorn and Nadal will be waiting for you, along with a few other driders. (Note: If you killed them earlier, you may not encounter any driders).
Returning to the Drow Camp
 When you return to Malavon, he is very pleased to hear that the Viciscamera has been destroyed (5850 xp for destroying the mechanism that was creating the driders). In exchange, Malavon tells you about a Mind Flayer and his thralls that are outside the Zhinda Citadel to the east. To get to the other side of the Spine of the World, you will have to go through the Citadel, and Malavon suggests that you harass the Mind Flayer in order to gain access to it. If you were able to convince Ginafae to return to her brother, ask Malavon whether or not he has seen her. Surprisingly, Ginafae will make an appearance - as a drow! Apparently her brother was able to transform her back (3900 xp). Ginafae is very grateful, and as a reward presents you with the House Despana Insignia and a House of Despana Piwafwi.
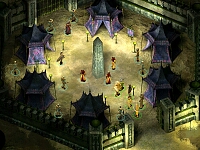
Head east to the Zhinda Citadel (the large doom on the east side of the caverns). Youll be met by a Mind Flayer named Beelthot, along with his thralls: four formorian giants, two drow wizards, and four duergar fighters. The duergar will be invisible until theyre ready to attack you. The Mind Flayer does speak to you, but not much comes of the conversation - although the dialogue can be amusing if you have non-humans speak with it. In the end, you will end up fighting the Mind Flayer and his thralls. The giants are easily the toughest part of the fight, so after killing the Mind Flayer, you will want to focus your efforts on them. When youre done, head inside the Citadel.