-

- Forums
- Chatrooms
- Gallery
- Gameplay Videos
- Upload
- Articles
- Mod Reviews
- Shop SP: Games, Movies, Books
CHAPTER 1 | CHAPTER 2 | CHAPTER 3 | CHAPTER 4 | CHAPTER 5 | CHAPTER 6 | CHAPTER 7 | CHAPTER 8 | CHAPTER 9 | CHAPTER 10 | |
Suldanessellar | Tree of Life | Hell | |
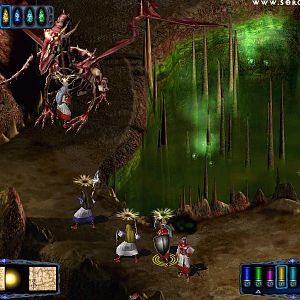
HELL
To Hell
Here is where the party has their souls dragged to hell after killing Irenicus.
Trial of Pride
Avastrian's task is now to collect Tears of Bhaal in order to open the way to a final confrontation with Irenicus. He goes first to the tunnel in the northeast corner. This leads him to a Demon of Pride. Each Tear of Bhaal requires a trial that is associated with a particular sin. Each trial has a good or evil choice attached to it. In this instance, the Demon of Pride urges Avastrian to kill a Dragon for the Tear of Pride. The good choice made by Avastrian is to refuse and simply ask the Dragon for the Tear. The evil choice is to kill the Dragon for the tear. The Dragon will leave behind a Robe of the Evil Archmagi, a Ring of Protection +2, some magical ammunition, and spell scrolls for Time Stop, Sphere of Chaos, and Wail of the Banshee, if you choose to kill it.
Avastrian takes the Tear and clicks on the door with it. His good reward is +20% to cold, electrical, and fire resistance. The evil reward would have been 200,000xp.
*Evil* Asteroth has to do most of these trials the same way. Otherwise, he will lose his spell casting abilities as he becomes a Fallen Cleric/Ranger. There is one exception to this that will be described below.
Trial of Fear
Now I go down the tunnel to the southeast. On the other side is a Demon of Fear, who offers a Cloak of Bravery made from Nymph skins and granting immunity to fear and panic so that I can obtain the next Tear of Bhaal. Accepting the Cloak is the evil path. Avastrian makes the good choice and refuses the Cloak.
After this, there's two possible ways to reach the Tear. The south path has a fear aura, although it's easily circumvented by a Remove Fear spell.
It's more beneficial to kill off the Beholders in the north path. Imoen starts off with an Incendiary Cloud. Anomen chips in with a Storm of Vengeance. Keldorn makes repeated use of Dispel Magic to make sure they stay vulnerable to the damage. They soon bowl over. Avastrian simply walks along the north path and to the end to retrieve the Tear.
I return to the door and click on it again with another Tear. Avastrian's good reward is immunity to +1 or lesser weapon. This is actually quite beneficial to Avastrian, as this immunity plus a Protection from Magic Weapons spell will mean complete immunity to any and all weapons for four rounds, not an inconsiderable benefit. The evil reward would have been +2 Constitution.
Trial of Selfishness
Now I go down the tunnel to the left. The Demon of Selfishness presents me with two choices. Go down the right path, let one of the party members die, but without Avastrian taking any permanent penalties. This is the evil path. Avastrian chooses the good path, going down the left hand side. This results in a minor loss of maximum hit points, a minor loss of xp, and a permanent loss of 1 Dexterity. None of this is a big deal though, not even the Dexterity loss. Avastrian's dexterity is still at 18 (with a +4 bonus to armor class). This reflects the Elven racial bonus to Dexterity, as well as the use of the Tome of Dexterity during EasyTutu.
I click on the Door again, and Avastrian gets a permanent +10% to magic resistance.
*Evil* Trial of Selfishness
The Selfishness Trial is the one instance where a Cleric/Ranger can go the evil path, and have his alignment changed to Neutral Evil, without falling and losing the benefits of the build. This involves going to the door to the right, and letting the Demon kill one of my companions, in this case Edwin. It simply becomes a matter of Viconia resurrecting Edwin. Poor Edwin, oh well ...
Asteroth gets a permanent +2 to Constitution as his evil reward after clicking on the door.
Trial of Greed
I now head for the southwest tunnel. The Demon of Greed gives me Blackrazor (+3 Longsword, regenerate 1 hp every 5 seconds, immunity to charm and confusion, 15% chance of draining 3 levels from target and healing wielder by 20 hit points and Hasting wielder for 20 seconds and boosting wielder's Strength by 3 for 20 seconds). The evil path is to use the sword to kill the Enslaved Genie. The good path, chosen by Avastrian, is to give the sword to the Enslaved Genie in exchange for the Tear of Bhaal.
The good reward is +2 to all saving throws. The evil reward would have been +15 hit points.
Trial of Wrath
Now I head through the northwest tunnel. Waiting for me is Wraith Sarevok. Choosing an angry response before fighting him is the evil path. Avastrian chooses the 'I pity you' reply to stay on the good path.
Avastrian does this fight by himself in order to minimize the risk to his party members. He always maintains a Protection from Magic Weapons on himself in order to completely immunize himself against Wraith Sarevok's attacks. He also uses the Flail of Ages to slow Wraith Sarevok down. Winning is a matter of course.
The good reward will be +1 to both Wisdom and Charisma. The evil reward would have been +2 to Strength. But I don't click on the door just yet, because that will start the final battle against Jon Irenicus, and I want to prepare for that first.
Final Battle against Irenicus
SCS makes an adaptation of Tactics' version of the final fight against Irenicus. One of the key differences between the SCS and Tactics versions is that Irenicus will no longer steal certain items like the Amulet of Power or the Cloak of Mirroring. Either way, it's a much improved take on the final battle of Shadows of Amn. Irenicus no longer shows up right away as a Slayer who stands around passively while the party routinely wastes his Demon helpers, as per vanilla BG2. Instead, he brags that he made far better use of the same tests you have just completed. He has sundered his spirit into five separate entities, each of which embodies the vice or sin associated with each of the five tests. Each merits an individual description.
Phase 1 Preparation
Chances are your usual spell configurations won't cut it. It pays to emphasize certain spells.
Phase 2 - Making a Start
Avastrian immediately summons a Simulacrum via his Vhailor's Helm. Anomen then casts Remove Fear. This is to protect everyone from fear-effects, but also to allow the Simulacrum to go after the Dragon of Pride without getting affected by fear. Avastrian then positions himself to intercept and hold up the Sword of Greed, as he's protected by his Amulet of Power. Imoen immediately heads to the southeast.
Phase 3 Slaying the Dragon of Pride
As far as Im concerned, it is absolutely imperative to take out the Dragon of Pride first and foremost. He can constantly keep the party off balance and vulnerable to the attacks of the others with his Wing Buffet. If he can catch the whole party with his breath weapon, then hes pretty much killed their chances.
I immediately have the Simulacrum immediately begin using one of its spammed Time Stop scrolls as soon as it is summoned. Imoen meanwhile tracks down the Dragon of Pride and hits it with Breach. It is critical to hit the Dragon with Breach before the Simulacrum finishes casting Time Stop, so that the Dragon's Protection from Magic Weapons is brought down. She also remains close to the Dragon and keeps it within view. The reason for this is that summoned creatures like a Simulacrum cannot target any monsters that are beyond the fog of war of any of the party members. They can only target monsters that are within party members' fog of war. This way, the Simulacrum can target the Dragon.
Once the Time Stop goes off, the Simulacrum immediately hits the Dragon with a Greater Whirlwind Attack. It's not quite enough, so the Simulacrum uses another spammed Time Stop scroll. The Simulacrum then finishes off the Dragon with a Whirlwind Attack.
Phase 4 Killing the Wraith of Wrath
The Wraith of Wrath closed in on the party before the first Time Stop went off. So, the very instant that the Dragon falls, I have the Simulacrum run and place itself right next to the Wraith. The Simulacrum continues to use spammed Time Stop scrolls, its remaining Greater Whirlwind Attack, and more physical attacks, to kill the Wraith of Wrath outright as well.
Phase 5 Breaking the Sword of Greed
Imoen now begins to cast Time Stop as soon as the Simulacrum has finished its sequence. She then positions herself right next to the Sword. The reason for this is that her spells will hit faster if they have less distance to travel. She unleashes two Abi-Dalzim's Horrid Wiltings, and then her Minor Spell Sequencer of two Magic Missiles on the Sword. This brings the Sword to 'near death'. Imoen then finishes it off with a third Abi-Dalzim's Horrid Wilting.
Phase 6 The Orb of Fear
I try to keep the Orb glued to one spot with Skeleton Warriors. Sometimes the Skeleton Warriors will overwhelm and kill the Orb. It's not a fool proof plan though, as the SCS Orb of Fear can fight back with its telekinetic powers. In this playthrough it came after my party, so Avastrian and Keldorn made it a priority to kill it as quickly as possible with Greater Whirlwind Attacks.
Phase 7 - Selfish Jon
In the meantime, when Selfish Jon shows up, it's high time for Avastrian (Cloak of Mirroring) and Keldorn (Carsomyr) to stay on top of him, while the rest of the party uses missile fire at a safe distance. Notice that I wasn't in a hurry to use Breach. The reason for this is Selfish Jon will use either a Protection from Magic Weapons or an Improved Mantle spell to protect himself. If it's an Improved Mantle spell, it will protect against +4 or lesser weapons. This means that a +5 or better weapon can hurt him. Furthermore, Keldorn's Carsomyr will not only hurt him, it will bring down his protections. Once this happens, the party is quickly able to kill off the Selfish Jon form.
Phase 8 Irenicus the Slayer
Things arent quite over yet. Irenicus shows up in Slayer form. Your comrades are also removed from the scene, making this a one on one affair. He also strips you of your equipment and teleports you to the south end. This phase is actually quite easy. One method is transform into the Slayer yourself, which will easily kick the crap out of Irenicus the Slayer. The drawback is that the protagonist is fatigued afterwards.
Since Avastrian is a Fighter/Mage, I was able to use a different method. Avastrian immediately begins to go north. Once Irenicus the Slayer draws close, Avastrian immediately casts Protection from Magic Weapons on himself. This allows him to safely make his way back to his equipments and put it back on (except his armor course). He continues to keep himself protected with Protection from Magic Weapons while he counter attacks Irenicus the Slayer. Note that I find it necessary to use the Celestial Fury +5 instead of the Flail of Ages, since Irenicus the Slayer still has very good armor class and has regeneration.
Phase 9 The Climax
Irenicus now shows up in his final incarnation in Hell. Much like Selfish Jon, but with the added differences that he can cast Cure Critical Wounds on himself, and that hes going to try and catch the whole party in devastating Time Stop sequences. If the whole party does get caught, you may as well reload. Imoen immediately summons a Planetar, while Anomen immediately summons another Skeleton Warrior. I then send them south. The idea is to keep Irenicus occupied while the party maintains a safe distance. When a Skeleton Warrior falls, Anomen simply summons another. Imoen also summons a Mordenkainen's Sword or two as well. When the Planetar is unsummoned, Keldorn replaces it with an Astral Deva. The idea is to wait it out safely while Irenicus' very extensive set of pre-buffs VERY GRADUALLY wear off, which includes a long lasting Spell Immunity: Abjuration.
At some point I find it safe enough to have Avastrian and Keldorn monitor things at a safe distance. Once I get a sense that the Spell Immunity: Abjuration has worn off, that's when I pounce. Avastrian and Keldorn pursue Irenicus up close, with Keldorn making use of either Dispel Magic or True Seeing. The rest of the party fires missile weapons at a safe distance. Irenicus eventually falls.
*Evil* Final Battle Against Irenicus
First, some preparations. Jan plants 3 Spike Traps a little to the southeast in order to catch the Dragon of Pride. He then plants two more, hoping to catch the Wraith of Wrath. *IMPORTANT!!!* Do not put traps where your enemies will initially appear when the fight begins. This runs the risk of leaving your game frozen by killing the enemies outright before any combat scripts or dialogue s can be triggered. Instead, place them where your enemies will be. This is why I avoided having Jan place his Spike Traps at the start of the corridors to the left and right, where the Dragon and the Wraith will initially appear.
Edwin then uses Project Image twice, in order to summon 4 Fallen Planetars, 2 to each side. Asteroth and Korgan kill off the Images in order to free up Edwin. Viconia waits until they have all been summoned before casting Remove Fear.
Once Asteroth taps the door with his last tear, he gets a +2 bonus to A.C. and his alignment change to Neutral Evil is completed. And so the dialogue leading into the fight naturally ensues.
Korgan leads 2 of the Fallen Planetars a little southeast in order to bring the Dragon of Pride into view. The plan works perfectly, as the 3 Spike Traps kill the Dragon outright at 5:50. Korgan is now wearing Balduran's Shield, so he continues to lead the Fallen Planetars southwards in order to hunt down the Orb of Fear.
Meanwhile, Asteroth and Edwin are trying to ascertain the position of the Wraith of Wrath and the Sword of Greed. Edwin begins to cast Time Stop with a view towards killing the Sword with a double shot of Horrid Wilting, and then a double shot of Magic Missiles via Minor Spell Sequencer. Except, things don't quite go as planned because the traps get the Sword instead of the Wraith like I'd hoped. So I had to improvise. I made a judgment call for Edwin to abandon the Time Stop. I then pulled Korgan over to the west, so that he and Asteroth can take the Wraith down as quickly as possible with Greater Whirlwind Attacks. It was near death, but a Fallen Planetar managed to finish it off with a vorpal blow.
One of the Fallen Planetars heads for Selfish Jon, which suits me just fine. Asteroth meanwhile was badly hurt by the Wraith, so he retreats and Viconia heads over to cast Heal on him.
Meanwhile, Korgan heads back to the southeast to check up on things with the Orb of Fear. It turns out that the other two Fallen Planetars have killed it off as well (around 7:45). Sweet ...
Now Asteroth, Korgan, and the Fallen Planetars begin their hunt in earnest for Selfish Jon. Viconia, Jan, and Edwin keep their distance. Its only a matter of time before his protections wear off and the combined effort takes him down.
Now comes the second phase of the battle, where Irenicus appears in Slayer form. This part is easily dispensed with, since my Slayer form will easily overpower his.
Now comes the last phase, where Irenicus is back in his accustomed form, and protected to the max. Asteroth takes the opportunity to end the Slayer change and put his equipment back on. Edwin and Viconia immediately summon a Fallen Planetar and a Skeleton Warrior respectively in order to hold up Irenicus. Edwin also throws in a Death Spell when Irenicus has summoned a few too many Mordenkainen's Swords.
The ultimate goal is for Asteroth to summon a Simulacram via his Vhailor's Helm, and then render Irenicus helpless with a Scroll of Protection against Magic. I got a little impatient and brought in the Simulacram too early. I really should have waited longer until Irenicus' invisibility had worn off so that I could target him with the Scroll. As it turns out, I have to weather a few Time Stop sequences, which fortunately I survived because Irenicus directed his efforts at the Fallen Planetar. In time, his invisibility does wear off and the Simulacram is eventually able to get him with the Scroll. The party then marches in and kills him.
The ending cinema for Shadows of Amn then follows.
Now I begin the Throne of Bhaal expansion.