-

- Forums
- Chatrooms
- Gallery
- Gameplay Videos
- Upload
- Articles
- Mod Reviews
- Shop SP: Games, Movies, Books
|
|
| Bard's Tale 3 Remastered Online Walkthrough by David Milward |
Lucencia | Violet Mountain, Level 1 | Violet Mountain, Level 2 | Cyanis' Tower | Alliria's Tomb, Level 1 | Alliria's Tomb, Level 2 |
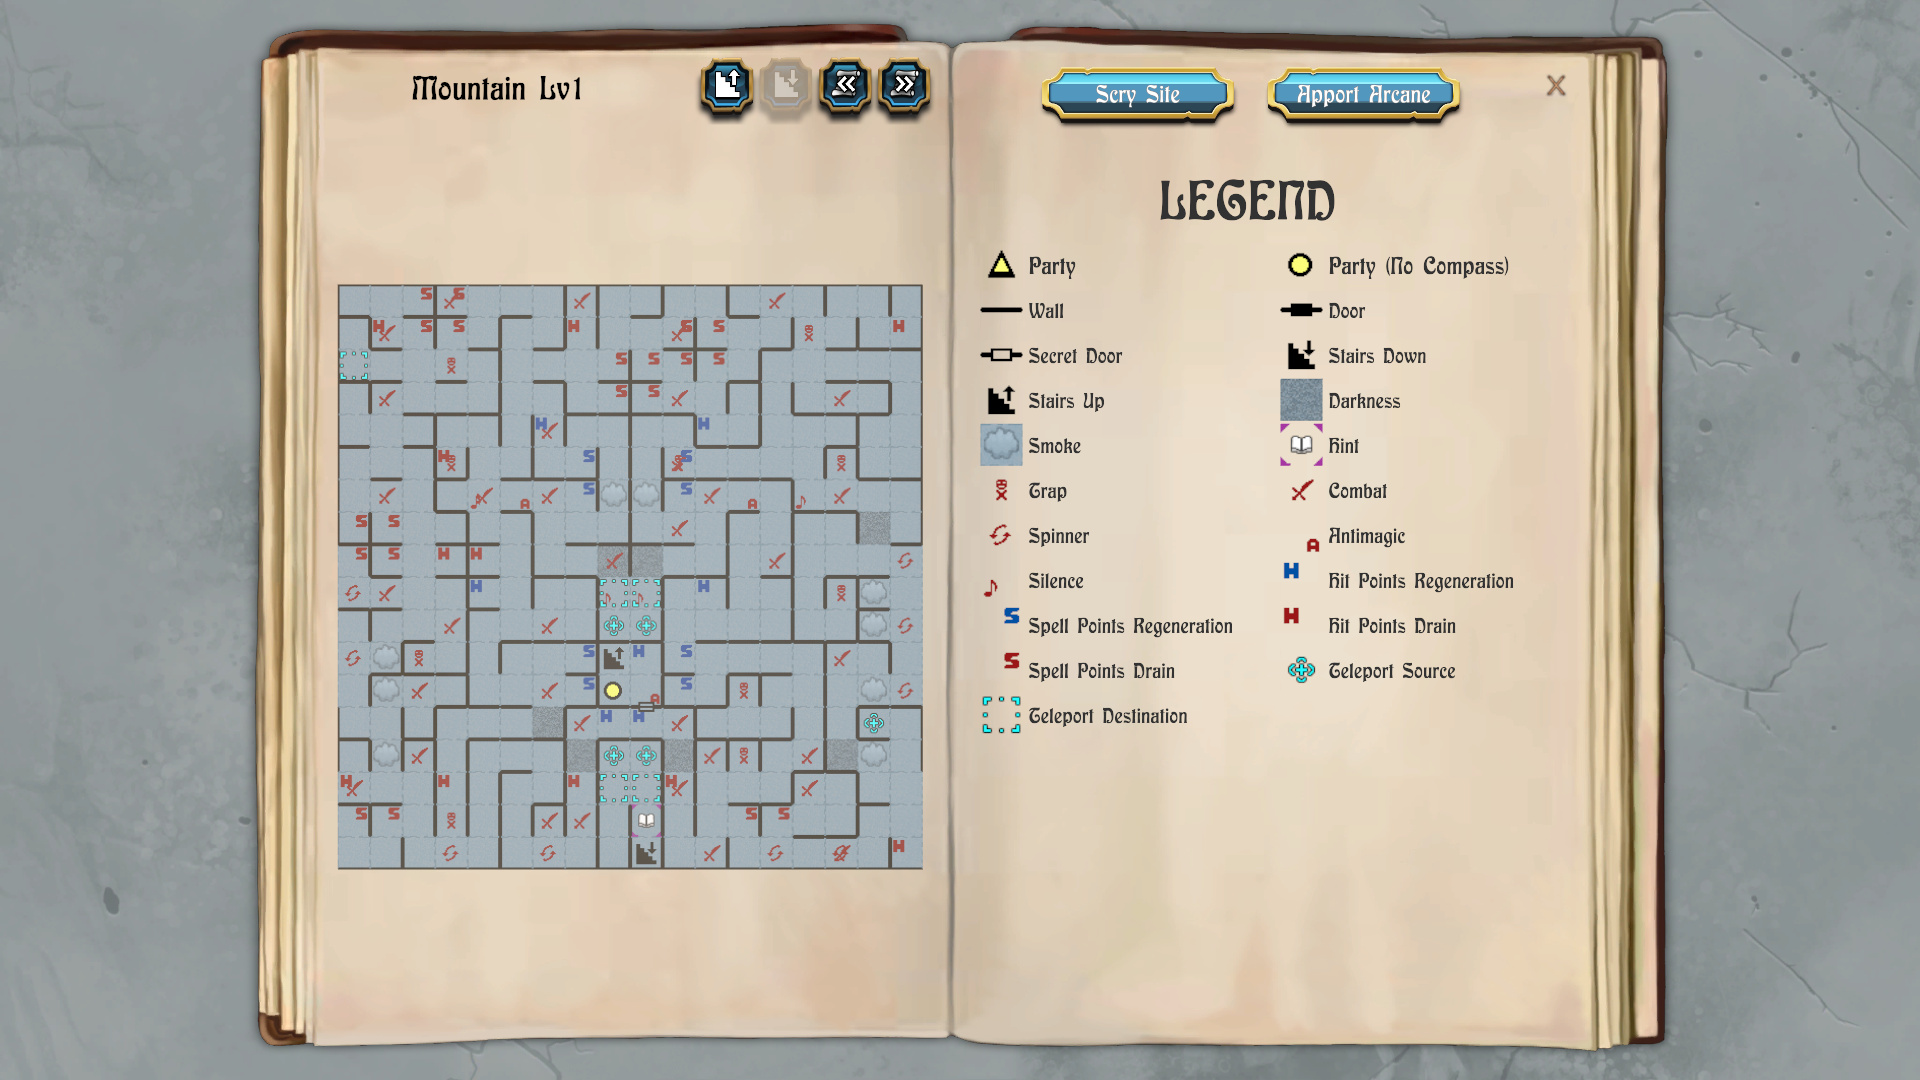
Violet Mountain, Level 1
Hunter's Cloak
I start off at 0N 9E on the map of the first level. I go north three
squares, and get teleported to 8N 9E. It is one of two silent squares, the
other one being at 8N 8E.
The teleporters at 7N 8E and 7N 9E provide the option of taking me back
near the initial entry stairs. I win fights against random monsters at 9N
8E and 11N 6E.
I backtrack across the silent squares, and win another fight against
random monsters at 10N 10E.
I sit on the square at 11N 10E until Talia replenishes her Spell Points. I
get a random fight, after which I get a Hunter's Cloak. It can be equipped
in the misc. item slot, and provides an 8 point improvement to AC and a 2
point bonus To Hit. Gallard wears it for the rest of the game.
1st Tungsten Shield
I fight random monsters at 11N 11E. I go across the anti-magic square at
11N 12E, and put up a Batchspell afterwards.
I fight more random monsters at 9N 13E and 3N 14E. I get a Tungsten Shield
after the last fight. Zarathos equips it for a 1 point improvement to AC.
Shadelance
I win fights against random monsters at 3N 11E, 0N 11E, 2N 10E, 2N 14E,
6N 15E, 11N 15E and 12N 10E.
I get a Shadelance after the last fight. Lord Stygar equips it. It does
pitiful physical damage, but it can cast Fanskar's Night Lance without
limit. It becomes a worthwhile weapon when used in conjunction with Ariel's
use of Kiel's Overture song. However, I still keep the Stoneblade in case
I decide need instant-death attacks for any particular fights.
1st Familiar Figurine
First I sit on the square at 12N 10E until Talia and Mordred are fully
recharged. I win fights against random monsters at 14N 15E and 17N 13E.
I get a Familiar Figurine after the second fight. The figurine itself is a
spellcaster's dream come true. The summoned monster you can get with it is
worthless. Its real utility is having a spellcaster equip it, and it will
double Spell Point regeneration. Of course, you need Spell Point
regeneration from somewhere to begin with, like being outside in daylight
or on a square that recharges spell points, to enjoy the benefit from
equipping the Figurine.
My plan is to have Talia and Mordred equip them, keep a third in pocket
for Zarathos when he becomes a Geomancer, and then have Ariel transition
to the Rhyme of Duotime as the exploration song. I have Mordred equip the
first Figurine.
1st Tungsten Plate
I win fights against random monsters at 14N 10E, 16N 10E, 17N 7E and 13N
6E. I sit on the square at 12N 7E so that Talia and Mordred can recharge
their Spell Points.
I get a random fight while sitting on the square. It provides a Tungsten
Plate armor as loot afterwards. Lord Stygar equips it for a 2 point
improvement to AC.
Minstrel's Glove
I win a fight against random monsters at 12N 6E after Talia and Mordred
are fully recharged. I go back north around a little bit to avoid the
anti-magic square at 12N 6E.
I thereafter win fights against random monsters at 12N 4E, 7N 6E and 5N
6E.
I get a Minstrel's Glove after the second fight. Ariel wears it for the
rest of the game, as it provides a 5 point improvement to AC.
I backtrack and make my way to the north edge of the level.
2nd Tungsten Shield
A random lone monster shows up and offers to join my party, but I choose to kill it. I get a second Tungsten Shield afterwards as loot. Ariel equips it for a 1 point improvement to AC.
Thieves' Hood
I win fights against random monsters at 17N 3E, 16N 1E, 14N 1E, 11N 1E,
8N 1E and 7N 3E.
I get a random fight at 6N 0E while travelling. The fight yields a
Thieves' Hood as loot. Cassandra equips it.
It allows her to cast the Invisibility spell without limit, which provides
+5 bonuses to both AC and saving throws that stack with other bonuses.
That power will become meaningful once I transition to Ariel having the
Rhyme of Duotime as her exploration song.
Surehand Amulet
I win a fight against random monsters at 5N 2E. I get a Surehand Amulet
after the fight. Cassandra will wear it, as it provides a Luck bonus that
will augment her Thieving skills, as well as her use of a certain other
item that I intend to find.
But I got distracted by a random fight before I could have Talia identify
its Luck bonus.
2nd Tungsten Plate
I win fights against random monsters at 3N 2E, 2N 0E and 1N 6E. I get a
second Tungsten Plate armor after the last fight. Zarathos equips it for a
1 point improvement to AC.
I thereafter win fights against random monsters at 1N 7E, 4N 7E and 4N
10E.
There is a secret door on the north wall at 4N 9E. The stairs to the second
level of the Violet Mountain are at 6N 8E.