-

- Forums
- Chatrooms
- Gallery
- Gameplay Videos
- Upload
- Articles
- Mod Reviews
- Shop SP: Games, Movies, Books
CHAPTER 1 | CHAPTER 2 | CHAPTER 3 | CHAPTER 4 | CHAPTER 5 | CHAPTER 6 | CHAPTER 7 | CHAPTER 8 | CHAPTER 9 | CHAPTER 10 | |
WINDSPEAR HILLS DUNGEON
Rukh Transmuter
The party now travels towards the northeast corner, and go through the dungeon entrance. They fight through more than one force of Hobgoblins, helped along by a Skull Trap from Imoen each time.
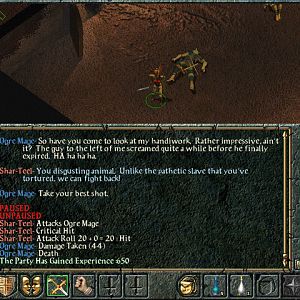
On the north side of this level of the dungeon will be a Rukh Transmuter, and several Kobold Kamikazes. The Kamikazes will attempt to get close enough to the party to explode themselves and cause fire damage to the party. There's an easy solution. Imoen quickly unleashes a Death Spell to instant-kill most of them before they can even reach the party. The Death Spell did miss one of them, but Imoen takes care of it with a Magic Missiles Spell. As for the Rukh Transmuter, Keldorn brings down its protections with a Dispel Magic. After that the party is easily able to bring it down. It leaves behind a Ring of Fire Resistance (+40% fire resistance), which Imoen will wear for the rest of the game. As a character who hangs back from the thick of things, it's more expedient to emphasize resistances to magical attacks than to worry about armor class and physical attacks.
Vampiric Mist Pool
Now the party starts to head west for a bit. Imoen instantly blows away a group of Ogrillons with a Skull Trap.
Avastrian and Anomen now head out on their own towards the southwest. Avastrian runs ahead and towards a cave in order to occupy the Vampiric Mists there. Anomen follows closely behind, and then instantly blows the Mists away with a Sunray.
The pool itself has a few gems, as well as an Amulet of Protection +1. The Amulet will become part of the Amulet of Ilmater, but I don't have enough gold for it just yet.
Flood at the Keep
Before I go on to the next level of the Dungeon, I take the opportunity to sell off some loot and then address another matter. After leaving the Copper Coronet (where I sold my loot) and heading back to the Windspear Hills, I have to deal with another random encounter.
Again, Imoen releases Chaos instantly. The rest of the party throws in other spells for good measure; Avastrian - Slow, Jaheira - Insect Plague, Anomen - Hold Person, Keldorn - True Seeing. It soon becomes a mop up.
A Keep Messenger informs me that there's been a flood. So I return to the Major Domo. I agree to pay 5,000 to rebuild the farmsteads, and then another 2,000gp in order to rebuild the dikes. I get 15,500xp for this.
Dereg and Flaylan
I return and have the party descend to the next level of the Dungeon. I am immediately ambushed by several Orc Archers. It is simple enough to simply return the missile fire and kill them off. Imoen unlocks the side doors afterwards so that I can loot their corpses for Arrows of Fire.
The party continues northwards. On the other side of the north door will be a few Golems. The Adamantite Golem gets replaced with a Juggernaut Golem, so I can't play the ol' 'shoot em down cause the big Golem can't squeeze through the door' trick. I thus have Avastrian go on ahead by himself to open the door, and then regroup with the party. This way I avoid having one or two characters get caught fighting several Golems at a narrow doorway.
I continue through the door, and then head through another door to the west. I kill off Dereg the Orc. I then interrogate Flaylan the Orc.
Troll Cook
The party returns to the hallway and then follows it to its east end. On the other side of the door is a Troll Cook. Combat is inevitable. The warriors in the party finish off the Troll Cook pretty easily. Imoen blows away the Hobgoblins that come in through the door to the south with a couple of Skull Traps.
The table in the room has 40 Arrows +2, 40 Crossbow Bolts +2, and a Troll Cookbook.
Avastrian opens another door to the south to reveal an Otyugh. It can't squeeze through the door, so Avastrian retreats and lets Jaheira take it down at a distance with her Firetooth.
Windspear Chapel
Now I head north a bit. At some point I have Anomen cast Chaotic Commands on both himself and Avastrian. Anomen then casts Protection from Fire on himself, while Avastrian readies himself with Mirror Images. They then go on ahead to the north, with Imoen following closely behind.
To the east of them will be an abandoned chapel that has several Ancient Vampires and Elder Vampires. Anomen begins casting Fire Storm. Just as Anomen is about to complete his casting, Avastrian casts Fireball. He then rushes forward to occupy the Vampires. Imoen then unleashes her triple shot of Skull Traps, which suffices to finish most of them off. Anomen charges in to help Avastrian against any that may be left.
The rest of the party explores the chapel afterwards. There's still one more Vampire in hiding, but Keldorn reveals it with a True Seeing and it's soon killed. Imoen disarms and loots a nearby trap for a scroll of Polymorph Self and some magical ammunition.
The party continues to follow the hallway to its end. Avastrian and Anomen then venture on to the room at the end. Avastrian holds up the Shadows, Wraiths, and Greater Wraith by himself. Anomen blows most of them away with a Sunray from behind Avastrian. The pair then finish off the remaining undead by themselves.
The room itself has a Chapel Key, although I'm honestly not sure what door it's meant to open.
King Strohm's Tomb
Now the party backtracks, and continues west until they hit a door. On the other side is a woman named Samia, who requests my help in getting past the guardians of King Strohm's Tomb. She also warns that one of the guardians cannot be seen, even through the aid of the most powerful magics.
There's a pretty risk free method of making progress here. Most of the guardians here are actually Efreeti, which can cast fire-damage spells. Minsc switches over to using the Wave Halberd. I always make sure that Minsc has a Protection from Fire spell cast on him as well, which will stack with the Ring of Fire Control and the Citadel Helmet. Minsc then simply goes around instantly killing the Guardians one by one with his Wave Halberd, while completely immune to fire damage. Each time Minsc picks up a piece of a mask that will be needed.
There are two other creatures of note here that aren't Efreeti. One is a Beholder called a Director, but the only powers it has are Magic Missiles and Burning Hands. Jaheira handles the Director. The Protection from Fire she casts on herself nullifies the Burning Hands, while her Harper Pin nullifies the Magic Missiles. The other is a Ghast. Anomen, protected by his Ring of Free Action, blows it away with his Mace of Disruption.
Once Minsc has found all six pieces, the complete mask will appear in Avastrian's inventory. Avastrian then hands the mask off to Minsc. Minsc puts on the mask, and heads for the north side of the tomb. The mask allows him to see the last Guardian, which is actually a Fire Elemental that can also cast damage-based spells. Minsc kills it instantly with his Wave Halberd. The party then regroups where Minsc had killed the last Guardian. Minsc switches back to his Silver Sword and Citadel Helmet.
Samia
I do some pre-buffing, and then send Keldorn ahead to loot the tomb itself for the Dragonslayer (+2 Longsword, Detect Invisiblity 1/day, immunity to fear, double damage vs. dragons) and the Dragon Scale Shield +2 (+25% each to cold, electrical, and fire damage).
This triggers the appearance of Samia and the rest of her Tomb Raiders. The same spells work as always, Chaos, Slow, Insect Plague, and Storm of Vengeance. Imoen chips in a Chain Lightning for good measure.
The loot includes a Plate Mail +1, a Studded Leather +2, a Wand of Fear, and a Medium Shield +1.
Dragon Helm
Now I back track southwards. I go through a door south of where I initially met Samia. The hallway on the other side leads westward. I end up killing several Dread Wolves and Greater Wolfweres (remember that they need +3 or better weapons to hit).
I continue west and then south. I came upon a bridge-like structure, with a well conspicuously in view. I click on the well, and an Air Elemental comes up that I'm forced to kill. A few Stone Golems and a Juggernaut Golem come from the north, and I have to kill them as well.
A Dragon Helm (+25% to each of cold, electrical, and fire damage) appears in my inventory. I already have the helmets I want, but I can sell it for gold.
Grancor
The party continues southward. On the other side of a door will be a couple of Wolfweres pretending to be wounded adventurers. It won't take much to call their bluff, and they'll attack. I kill them, and a couple more Wolfweres in the next room. The third room further down has a cabinet and a container that will contain magical ammunition, a Horn of Blasting (2-20 damage to anyone in area of effect and stun for 2 rounds unless save vs. spell is made), and spell scrolls for Hold Undead, Domination, and Hold Monster.
Captain and Gerg
Now the party continues in a north and west direction. They find a Wolfwere Captain in an argument with a Troll and a Hobgoblin named Gerg. I decide to squeeze as much xp as I can out of this by killing the Troll, then Gerg, and then the Captain.
I go through a secret door to the north. On the other side are two Stone Golems, and an Adamantite Golem. An Adamantite Golem is like an Iron Golem in that it can also occasionally emit a poison gas cloud. Beyond that, an Adamantite Golem is much worse. It can only be hit by +3 or better weapons. And even then it enjoys about a 90% or more damage reduction against +3 or better weapons. But my armor class and THAC0 are pretty good. I also have a trump card. The slow power of the Flail of Ages ignores both saving throws and magic resistance. Avastrian soon slows the Adamantite Golem down so that it poses very little threat.
A nearby treasure cache holds a couple of Moonbar Gems, a Beljuril Gem, and the Heartseeker +3 (+2 THAC0, +4 damage, +7 THAC0 for 9 seconds 1/day). I didn't really bother with the Heartseeker, since its extra aim power is so brief.
Tazok and Chieftain Digdag
The party backtracks and goes across the gangway where the Golems had come across from the north. They easily kill a few Orogs here and there.
The follow the gangways and rooms to their end, until they find a room that has both Tazok and Chieftain Digdag. They, as well as their Orc minions, rely on straight physical attacks so killing them isn't very hard for my party.
The table and the cabinet will have some valuable gemstones, as well as a scroll of Fire Shield: Blue. Iltha is being held captive in a nearby cell, and I'll need to find the key.
Conster
I now descend the nearby stairs. I travel southeast in the cavern, and discover that Firkraag is in fact an enormous Red Dragon. I choose not to fight him, for now.
Firkraag offers me the chance to rescue Iltha if I can kill his pet wizard, Conster. Conster teleports upstairs next to Iltha's cell. I buff up before I go back up the stairs, including a Spell Immunity: Abjuration for Avastrian.
Once I go upstairs I have Avastrian rush Conster. Keldorn unleashes his Dispel Magic, which brings down Conster's protections but has no effect on Avastrian. This is a fairly standard theme. Conster falls pretty easy afterwards. I loot his body for the Firkraag Prison Key, and then get 23,750xp for freeing Iltha.
Firkraag
Now it's time to fight Firkraag. The ol' "lower his magic resistance and his saving throws and then zap him with Finger of Death" trick won't work anymore. The latest release of SCS immunizes dragons against instant death attacks. For the sake of challenge, I also chose the setting that triples their hit points (more or less). Firkraag has 600+ hit points and I've gotta go the distance with him. I'll need a concrete plan for this.
Remember all those scrolls of protection I bought? I now give everybody in the party at least two Scrolls of Protection from Fire. Minsc has to use Potions of Fire Resistance, since his Intelligence is too low to use a scroll. The party then rests up.
I then go back down the stairs, and then go forward but not so far that Firkaag comes into view. I then do the following preparations:
The plan soon becomes apparent. Avastrian is the only character who fights Firkraag up close, protected by his buffs. He'll often use Protection from Magic Weapons to provide himself with complete protection against Firkraag's claw attacks. His Spell Immunity: Abjuration prevents Firkraag's Remove Magic from bringing down his buffs. The Skeleton Warriors help to distract Firkraag as well.
Everybody else takes their shots from a relative safe distance with missile weapons. If their fire resistance gets brought down by Remove Magic, they use either a Scroll of Protection from Fire or a Potion of Fire Resistance to bring it back up.
The plan isn't foolproof though. Firkraag uses his wing buffet ability generously, and this often means Avastrian will get blown back and then Firkraag will charge after party members. This also means that other party members need to retreat long enough for Avastrian to get back into toe-to-toe position. Also, Firkraag's attacks (breath weapon included) will often still manage to inflict plenty of damage, so retreating and healing is still often necessary. Nonetheless I manage to wear him down with time and persistence. Keldorn manages to land the killing blow with Azuredge of all things.
Firkraag leaves behind:
Red Dragon Scale Armor
First I leave the dungeon and then bathe with Jaheira as part of the Flirt Pack mod. I then head back to Garren's Cabin. Everybody in the party gets 44,500xp as a reward.
I now head back to Cromwell's, and have him create a few items for me. The first is the Red Dragon Scale +2 (armor class -1, +50% fire resistance). This will be Jaheira's armor for the rest of the game. It's second best in the game in terms of armor class. Furthermore, Jaheira already has cold resistance on account of her boots and immunity to electricity on account of her Harper Pin. The armor rounds things out for her.
Another item I have made is the Ring of Elemental Mastery (+1 armor class, +50% fire resistance, +50% electrical resistance, charm elemental 3/day with no saving throw, summon elementals 1/day, Improved Invisibility 1/day). This requires the Ring of Earth Control, the Ring of Fire Control, the Ring of Air Control, a green Scroll of Protection from Fire, a green Scroll of Protection from Electricity, a green Scroll of Protection from Petrification, and 20,000 gp. This will be Minsc's ring for the rest of Shadows of Amn. One of the advantages of the Item Upgade Mod is that if the party doesn't have enough inventory slots for some of the available items (e.g. more rings than available ring inventory slots for the party), the Item Upgrade Mod can alleviate the problem by allowing the merger of some of those items into a single item.
Another item I have made is the Amulet of Ilmater (+1 armor class, +3 to saving throws, Heal 1/day, immunity to poison), which requires two Amulets of Protection +1, the Periapt of Proof against Poison, the Necklace of Form Stability, the Amulet of Spell Warding, and 10,000gp. Again, since I only have so many amulet slots available in my party this is a very useful item. Minsc will wear it for the rest of Shadows of Amn for its obvious defensive benefits, but it also lets him use Heal on himself when his hit points are getting low.
Now I have a bunch of Liches to kill.