-

- Forums
- Chatrooms
- Gallery
- Gameplay Videos
- Upload
- Articles
- Mod Reviews
- Shop SP: Games, Movies, Books
|
|
SWAMP CAVE
Lizardfolk Warriors in the Mere of Dead Men
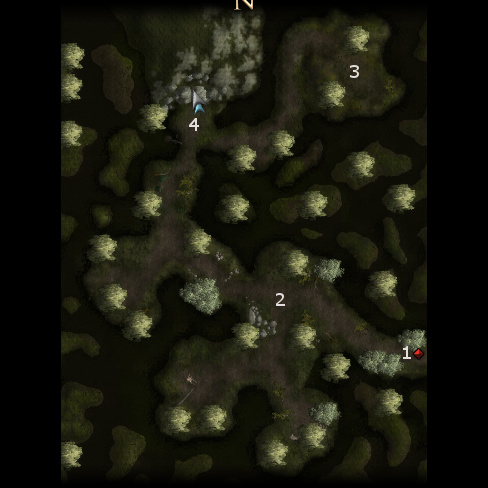
Now's a chance to explore the Swamp Cave that appears on the world map just to the right of the Weeping Willow.
I start off at #1. Several Lizardfolk Warriors are ahead at #2, attacking Galen and his two Mercenary Guards. I jump right in, and as always make sure I land the killing blows in order to collect the xp. I also make sure to deliberately antagonize the Mercenary Guards during the ensuing dialogue in order to increase my influence with Khelgar.
There will be several more Lizardfolk Warriors scattered throughout the area, and the formula is always the same. I let Khelgar stick his neck out, and Valeria keeps her distance until she's ready to swoop in for the kill with her sneak attacks.
There will be more Lizardfolk guarding the entrance at #4. I get their attention and then retreat in order to avoid tripping a trap that they've set up, and then kill them after I've lured them away.
Valeria can then recover the trap at leisure. Sometimes that means temporarily removing armor and shield in order to minimize any armor check penalties.
Giant Spiders in the Mere
Just to the right, at #3, will be a trio of Giant Spiders. Khelgar goes on ahead and pretty much kills them by himself.
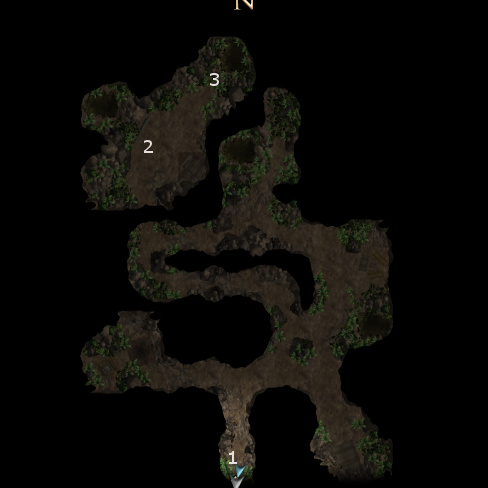
Lizardolk in the Swamp Cave
I start off at #1. There are plenty of Lizardfolk throughout the cave, and the formula of Khelgar holding them and Valeria picking her spots for sneak attacks works most of the time. There is the odd trap in the cave, so sometimes I have to retreat first to lure the Lizardfolk away from the trap so that Valeria can recover it later.
At #2 will be a Lizardfolk Warrior, a Lizardfolk Shaman, and the Lizardfolk Chieftain. The Shaman can cast spells like Sleep and Daze. The Chieftain starts off by activating his Barbarian Rage, and his weapon inflicts extra fire damage. The two of them together can be quite dangerous for a lower level party, especially if Valeria or Khelgar miss their saving throws against the Shaman's spells and become vulnerable to the powerful physical attacks of the Chieftain. I start off by opening the door and sending Khelgar in by himself. What this means is that the Shaman targets Valeria with a Sleep spell, which Valeria resists since her Elven heritage gives her a saving throw bonus against sleep, while Khelgar avoids it completely by running on ahead. Khelgar takes out the Shaman and the Warrior in rather short order. That leaves the Chieftain, who is pretty tough even on his own. It was a close shave, but I did manage to bring him down in time with Valeria flanking him for sneak attacks. The Beetle Familiar also chipped in with a Shocking Grasp or two to wear down the Chieftain.
The Chieftain leaves behind the Bone Phoenix (Morningstar +1, +1d6 fire damage), which makes for a good interim weapon for Khelgar. The Shaman leaves behind the Greater Gloves of the Minstrel (+6 Perform, Bards only), which I hold onto for Grobnar.
There are a pair of locked and trapped chests at #3. One has random loot. The other has a random item plus the Boots of Winterland (+5 cold resistance), which I hold onto for the time being.
Leaving the Swamp Cave
There will be a few more Lizardfolk in the Mere of Dead Men again, after I've exited the Swamp Cave. Same formula works as always.
My next destination is Fort Locke.