-

- Forums
- Chatrooms
- Gallery
- Gameplay Videos
- Upload
- Articles
- Mod Reviews
- Shop SP: Games, Movies, Books
|
|
Pentical Bleth's First Quest
Finding a Ship
I return to the Black Eye Tavern and enter within. In the southwest corner is Captain Merrig, who's willing to hire out his ship so that I can reach the Dark Dahlia. His price is 40,000gp, and there's no way to bring it down. Note that in order for this quest to become active, and be able to progress it further, you have to get him to spell out his 40,000gp price during dialogue.
I could pay it now, but there's another quest I'd rather do first.
Rinara's Fortune
I head back to the Black Eye Tavern and leave Mantides and Charissa behind. Rinara won't want them coming along for the next quest. I make for the Arena District.
Once there, Rinara and I have a conversation. She wants to recover a stash that she had hidden away in the Vhammos Mausoleum, and I eventually agree. I avoid the "Much like yourself" dialogue option, which would lose -1 influence with her.
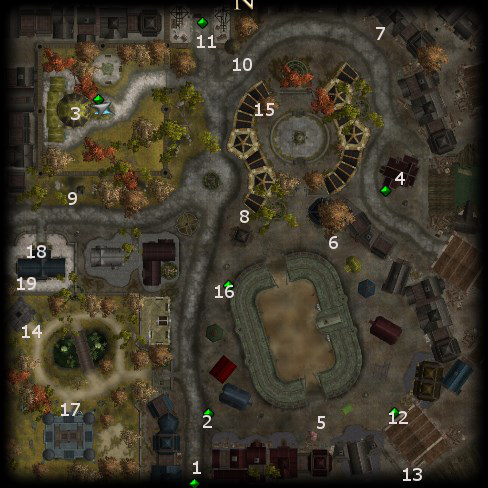
The entrance to the Vhammos Mausoleum is at #14 on the Arena District map, which Rinara opens.

I start off at #1 on the Vhammos Mausoleum map. At #2 are some Fresh Mummy Wrappings, which I keep since they will come in handy later on.
At #3 will be our first encounter with Greely, an undead spirit. He summons a couple of Zombies, Egar Vhammos and Magdalene Vhammos. My strategy, whenever possible, is to have Rinara hold up the undead while in Parry mode so as to give Salazar a free hand to blast away. I have Salazar deactivate his Hellfire mode for this dungeon though, as Charissa can't be around to cast Death Ward on him. Rinara afterwards explains who Greely was and why he's upset enough to become a restless undead.
*Evil* This quest was tougher for Selene and Rinara, since they have no spellcasting abilities. They're also faced with undead monsters that have significant damage reduction against their weapons, and inflict disease with their own attacks. The Morningstar Haven is still accessible despite the fact that I threw my lot in with the Ebon Claws. I load up on Potions of Cure Critical Wounds and Potions of Cure Disease before venturing in. That gives me enough rope to outlast the undead, and cure myself of disease after the battles. In fact, I'm not above killing an undead, leaving the dungeon to rest up, and coming back in to finish business. The gate will be locked, but Rinara can always open it for me.
At #4 is another encounter with Greely, who summons more Zombies, Little Carby Vhammos, Meddie Vhammos, and Reverian Vhammos. The same strategy applies.
At #5 is where I encounter Greely a third time. This time he summons two Zombie Lords, and Grandfather Vharlan Vhammos, who casts Clerical spells like Searing Light, Hammer of the Gods, and Inflict Minor Wounds. It's a tougher fight than usual, but with the same strategy I manage to hang on and outlast them.
At #6 is Rinara's gold stash, of which she gives me 1,000gp. I also get 2,250xp.
At #7 is some Preservation Fluid - B, which I hang onto as I'll be using it very shortly.
I make my way out. However, I stop off at the room at #8. Within is a sarcophagus containing the corpse of Lily, whom Greely had frequently mentioned beforehand. I first replace her mummy wrappings, and then use the Preservation Fluid on the new wrappings. That suffices to put Greely's spirit to rest, and earn another 500xp.
I leave the Mausoleum, only for Rinara and I to get ambushed by Viglor and two Night Mask Thugs. It doesn't matter what I say, a fight is inevitable. The same strategy applies, although early on Salazar has to use Walk Unseen because he starts off as the initial target and needs to put some distance between himself and the rest of the combatants. It's a tough fight because Viglor can hit for plenty of damage, but again I manage to outlast the enemy. Rinara will give me some more gold when it's over. Precisely how much depends on how much influence the protagonist has with her.
Viglor drops the following:
12th Level
And here the party members advance to their 12th level of experience.
Investigating the Dark Dahlia
Now I do pay Captain Merrig his 40,000gp. No worries, I'll get it back with interest afterwards. I soon board his ship along with his crew of Pirates. Note that I could also have gotten a 10,000 advance from Pentical Bleth to help cover the fee had I made a Diplomacy check with her, but I did not find it necessary.
I soon get attacked by a sea serpent called a Quelzarn, which mostly attacks with a breath weapon that inflicts cold damage. It cannot be reached with melee weapons. You need either spells or missile weapons. There will be barrels aboard the ship from which you can acquire a crossbow and some bolts if you need them. For me, I had Charissa cast Death Ward on Salazar. Salazar then forces the Quelzarn away very easily with his Hellfire-charged Brimstone Blasts because a Quelzarn is vulnerable to fire damage.
We then board the Dark Dahlia, where I have to fight Gothos One-Eye and his crew of Night Mask Thugs. Rinara goes around sneak attacking, since the Thugs are distracted by Merrig's crew members as well. Mantides and Charissa are hacking away, while Salazar is blasting away. Gothos leaves behind the Ship's Hold Key, and Stormbringer (Battleaxe +1, +1 electrical damage, Lightning Bolt (5) / 1 charge), which I'll just sell when I get the chance.
The Ship's Hold should be within immediate view. I rest up, open the Hold and descend downwards. I buff, include Death Ward for everyone but Rinara in anticipation of the next fight. Within the hold itself will be a couple of chests with random scrolls and gemstones.
At the far end of the Hold is a sarcophagus. Opening it leads to the discovery of Kajeel's Letter, leading to the next quest. It also leads to an attack by the Vampire named Latasha. I have little trouble driving her off.
Once it's all said and done, I speak to Captain Merrig again, who returns me to Harbor Loop before he himself skips out of town.
The Tyrran Enclave
The next quest becomes available after having boarded and investigated the Dark Dahlia. I start off where I had first stepped foot onto the docks when the game first started. I continue towards the west side of the Harbor Loop, and then somebody named Seeker Tarnesh speaks to me. Somebody of Tyr's faith named Brother Edens wants to speak to Salazar and Charissa. Charissa will want to see Brother Edens immediately, and if you refuse she'll leave and take care of matters herself, after which she can be found in the Black Eye Tavern afterwards.
Once I agree, I can either travel there by foot, or select the dialogue option that involves seeing Brother Edens immediately. I chose the latter. The short of it is that Brother Edens wants Charissa and I to immediately end a slaving operation run by a Thayan Wizard. I agree to the task.
For future reference, the Shrine of Tyr where Brother Edens resides is at #15 on the Arena District map. I make my way to the west side of the Harbor Loop.
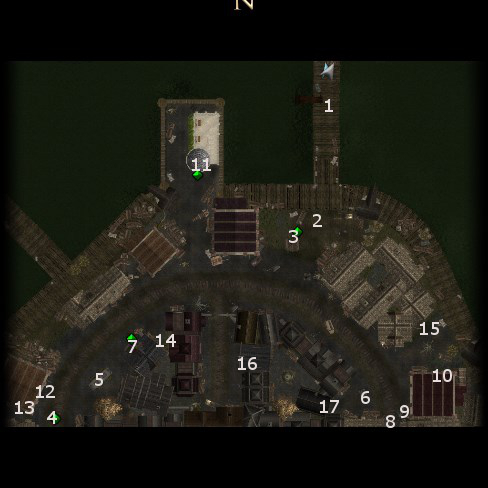
The entrance to the Thayan Compound is at #12 on the Harbor Loop map.
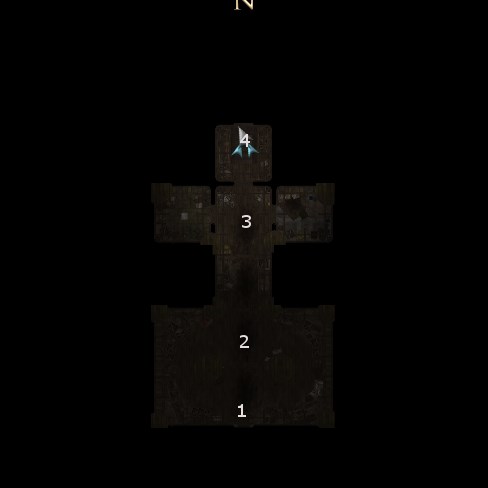
I start off at #1 on the Thayan Compound map. Ahead at #2 will be a LOT of Shadows. However, I'm strong enough now that I can bring them down in physical combat helped along by Brimstone Blast / Eldritch Chains from Salazar.
At #3 is a gong that alerts enemies on the next level to my presence, and supposedly makes the next battles tougher. However, I know of no way to avoid the gong going off. The north wall is actually an illusion that reveals the door leading north once you get close enough to it.
At #4 is the stairs down to the Cellar.
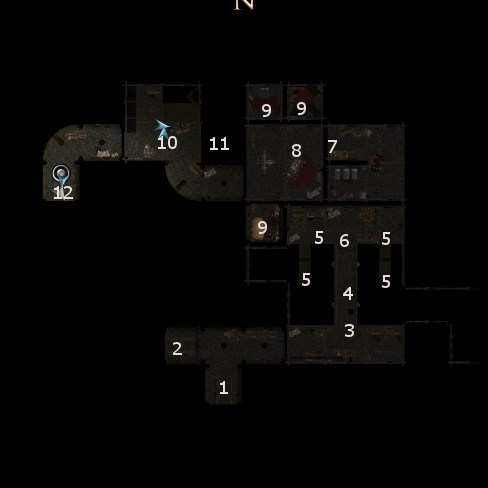
I start off at #1 on the Cellar map. At #2 is an apparent side entrance, but I have no idea as to its relevance.
The room east has a major fight that can be tough. Groups of Slavers that can use missile fire are stationed at points marked #5. A group of Duergar Miners who can also use missile fire until they're closed in on are stationed at #6. They are led by a Duergar Work Chief. A blockade is at #3. It consists of several pieces that need to be physically destroyed before the party can go across. At #4 is a trap that both inflicts fire damage and slows party members. As far as I can tell it cannot be found and disarmed.
The reason the battle can be tough is that the enemies will be able to get in massive volleys of missile fire for probably several round before the party can even reach any of them. However, I employ a certain strategy that makes things much easier. Charissa easily has the highest armor class in the party. She issues a 'stand your ground' command to the rest of the party and makes herself the primary target of the missile fire for the rest of the fight. And she barely takes a scratch over the long haul.
Salazar then comes up behind and begins blasting away. He uses Vitriolic Acid / Eldritch Chain on any clusters of enemies that are within reach. Several of the enemies are beyond the reach of an Eldritch Chain though. For them, I use Vitriolic Acid / Eldritch Spear. Once it's all done, I can then safely pick apart the blockade and make my way across the gangway.
The Duergar Work Chief leaves behind a Half-Plate and a Warhammer +1, both of which I'll sell, as well as Thrung's Key. Thrung's Key will open the door at #7.
At #8 will be a Thayan Wizard named Falucca Ardarbrent, her lieutenant named Salizar who can also cast spells, and two Ogres named Cleops and Cloves. Salazar protects himself with Walk Unseen, takes up a safe position, and then blasts away with Vitriolic Acid / Eldritch Chains. Rinara holds ground in Parry mode. Mantides is busily hacking away. Charissa opens things up with a couple of Chain Lightning spells, and then wades in. The battle is soon won, and Falucca flees.
The loot includes:
Rooms marked by #9 have treasure chests with random loot in them.
At #10 is where I meet Falucca a second time. Falucca releases poisonous gas onto the prisoners held captive in the room at #11 to create a distraction so that she can flee. It forces me to make one of two choices.
I could free the prisoners. One way to do it is to make an Intelligence check on the Slave Controller in the room, or to have a party member bash down the door to the room at #11. My alignment would have experienced a slight shift towards good. I would also have gotten 500xp. However, I prefer not to. I would have taken a -1 influence hit with Charissa, and indeed she would have briefly left the party to chase after Falucca, who ultimately escapes. I also would not have been loot any items from Falucca. Charissa would have rejoined me after Falucca get away.
I ultimately prefer to chase after Falucca right away, catching up with her at the exit at #12 and then killing her. I also get 500xp as well. However, it would mean leaving the prisoners to their fate and me taking a 1 point alignment shift towards evil. But I don't mind, since my alignment was still 89 points towards good anyway. The benefits are better this way. I get a +1 influence increase with Charissa, but without losing any influence with either Rinara or Mantides.
Once Falucca is dead, Charissa reads through her journal and learns that Brother Edens is in fact the past infamous pirate captain called Pharros Sneed, who was responsible for the wrongful imprisonment of Charissa's parents. Charissa will want to see Brother Edens. But first, I have some looting to do.
Falucca leaves some random loot, plus:
I make my way back to the Shrine of Tyr at #15 on the Arena District map. What ensues is a prolonged conversation between Charissa and Brother Edens. I now have a choice, to either counsel Charissa to execute Brother Edens, or to spare his life. Neither choice has any long-term ingame consequences. It's simply a roleplaying story choice on my part. I chose the latter. I also get 3,000xp for completing the quest.
*Evil* Selene counsels Charissa to kill Brother Edens, which she does. Charissa experiences a moment of regret once we leave out the door, but it soon lapses.
Belts of Agility
I leave the Shrine, and Charissa wants to speak to me again. The tone of the conversation will depend on whether I had persuaded Charissa to execute Brother Edens, or spare him.
I next make my way to Undergate. I sell all the spare loot I had been carrying to the Lizardfolk Shaman, and end up with almost 100,000gp. I take the portal that transports me to the Market Triangle.
I pay another visit to Mintassan, and purchase the following:
Now it's time for me to do the second quest for Pentical Bleth.