-

- Forums
- Chatrooms
- Gallery
- Gameplay Videos
- Upload
- Articles
- Mod Reviews
- Shop SP: Games, Movies, Books
|
|
Quivering Thumb
Turfang
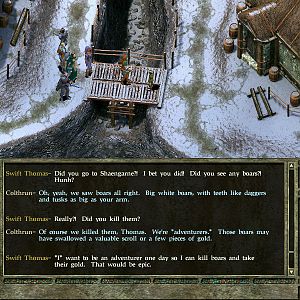
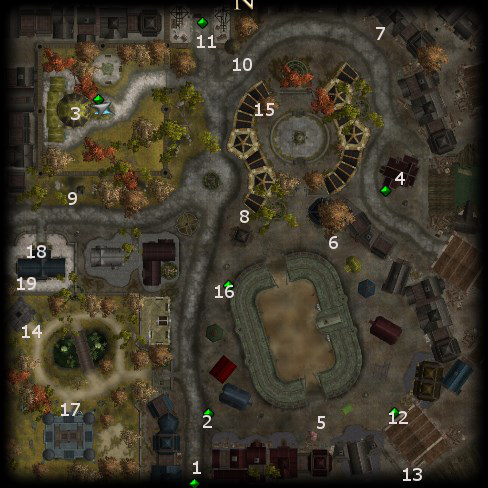
I want to begin some competing in the arena, so #16 on the Arena District map is the place to go. Benevolent Kalim runs the one on one competitions.
Salazar's first opponent is a Flind Shaman named Turfang. The fight is easily won with a few Noxious Blast / Eldritch Spears. I get 500xp.
*Evil* This fight and the next two are ridiculously easy for Selene. She just goes into stealth mode, even in full view of her enemy thanks to her Hide in Plain Sight ability, and then hits her target from behind. Her Golden Bamboo Staff typically stuns the target on the first blow, so she can continue to sneak attack away until the battle is won in short order.
The Fate of Mantides
Once I win the first fight, a man named Dorn shows up who wants vengeance against Mantides. Mantides automatically wins the battle in the Arena.
I then have a choice. The evil choice is to counsel Mantides to slay Dorn, which I get into just below.
The good choice that I show here is to counsel Mantides to spare Dorn, which will result in a +2 influence gain and Mantides soon enough becoming a Paladin.
*Evil* The Fate of Mantides
The evil choice is to convince Mantides to kill Dorn. A Priestess of Shar shows up immediately after the victory, and beckons Mantides to seek out High Priestess Velisha in the Dark Lady's Promise.
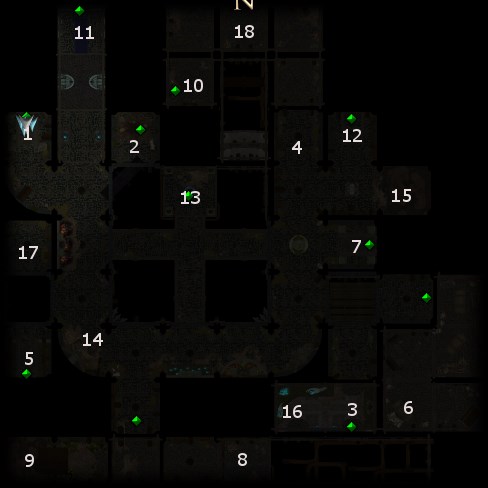
The entrance to the Dark Lady's Promise is at #11 on the Undergate map. A very low influence with Mantides, plus the fact of Mantides' killing Dorn in the area, means I have little trouble convincing Mantides to take Shar of on her offer of Mantides becoming her champion.
Mantides will still have all the feats and skills and so on that I selected for him during the level ups. He is rewarded with two items. One is the Darkstar (Greatsword +3, Level Drain DC=18). The other is the Night's Embrace (Full Plate +3, Darkvision, +15 cold resistance).
Masked Marauder
Mantides lends his Greater Swordsman's Belt to Salazar. Charissa casts Death Ward on Salazar. It's all preparation for the coming battles.
The next battle is against the Masked Marauder. Salazar has little trouble after holding her still with a Noxious Blast and then finishing her off with Vitriolic Acids. I get 1,250gp for beating her.
Jargle
My next opponent is a Frost Giant named Jargle. Here is where I begin to use a hit and run strategy that eventually succeeds, hit Jargle at a distance with a Brimstone Blast / Eldritch Spear, use Walk Unseen as a Hide in Plain Substitute, put as much distance between Jargle and myself, and then repeat. I get 2,500gp for winning.
Maevhaun
Next up is a Mage named Maevhaun. Maevhaun has spell resistance, so I lead off with a Vitriolic Acid / Eldritch Spear. He summons a Fire Elemental. I then tag the Elemental with a Vitriolic Acid / Eldritch Chain, which finishes off Maevhaun as well. It is preferable to win this quickly if possible. Otherwise, Maevhaun will use Greater Invisibility and buff himself, and that means you may have to wait a good while before you can make progress. I get 4,000gp for winning.
*Evil* Selene's approach to this battle is essentially the same as the previous three, but with the proviso that she first stays in stealth until Maevhaun's Greater Invisibility wears off. Only then does she strike with prejudice.
Twilight Knight
My last and toughest one on one battle is against the Twilight Knight, who's a Vampire Blackguard. His attacks inflict enough damage as it is, but he can enhance them further with powers like Smite Good and Divine Might. He can also defend himself with Divine Shield. His blade also has a dispelling effect with a high DC, which means any contact with me is very likely to tear down any buffs that I may have on myself.
I employ the hit and run strategy, but I need to refine it because the Twilight Knight is a lot faster than Jargle. I had previously sold off a couple of Potions of Speed to the Druid Merchant, plus she had one in her own sale inventory beforehand. So I first take a trip to the Market Triangle and buy those Potions back.
I rest up and buff up over again before starting the final fight. Once battle begins, I start off with Walk Unseen. I then try to put as much distance between myself and the Twilight Knight as the area allows. Once I've gotten that distance, I safely ingest a Potion of Speed without blowing my cover.
That's when I start my hit and run game. I did end up having to ingest another Potion of Speed once I had a relatively safe opportunity to do so and after my first one wore off. Once the Twilight Knight is near death, I deliver the finishing blow. I get 10,000gp for the victory.
*Evil* The Hide in Plain Sight approach won't work since the Twilight Knight, as a Vampire, is immune to both sneak attacks and stunning. Selene borrows Manitdes' Swordsman's Girdle and Charissa's sword that inflicts both fire and holy damage beforehand. She immediately gulps a Potion of Speed, and goes straight for the physical attacks on the Twilight Knight, since he wasted time summoning a Fiendish Dire Rat and a Skeleton Warrior and activating a Divine Shield. She actually managed to cut him down in pretty short order.
Purple Legion
I do some buffing up beforehand, Death Ward for Salazar, Magic Vestment for Charissa, Greater Magic Weapon for Mantides, Eagle's Splendour for Charissa, Bull's Strength for Salazar, Magic Circle against Evil.
Now I speak to Dutiful Azarm for the group fights. My first one is against the Purple Legion. It's a fairly simple and straightforward fight. Charissa and Rinara hold tank positions. Mantides comes up behind and starts swinging away. Salazar blasts away. The reward is 1,000gp.
The Menagerie
Before the next fight, a woman named Sal pleads with me to fight the Menagerie before a few slaves, including her brother, are sent to their deaths against them. Dutiful Azarm is reluctant to accede to that request, but a Diplomacy or Intimidate check can suffice to make him back down.
The battle is against a Wereboar, a Werebear, a Werebadger, and a Werewolf Lord. The same routine follows as with the fight against the Purple Legion.
I get 2,500gp as a reward. However, Lord Rochester shows up angry about me thwarting his plans to throw his slaves to the wolves, literally. I choose the course of action that results in a +1 alignment shift towards good, buying the slaves from Lord Rochester for 5,000gp and then setting them free.
Dukes of Daggerford
I add additional buffs before the last battle. Charissa makes sure everyone has both Spell Resistance and Death Ward cast on them.
The next fight is against the Dukes of Daggerford, an adventuring party that consists of a huge warrior named Tiberius, a Halfling Shadowdancer named Hugie, a Bard named Codepoetz, a divine caster named Chalsseus, and arcane casters named Tyrian and Alazander. The fight can be tough. Aside from the spellcasters, Tiberius scores massive damage and Codepoetz can use Curse Song on the party.
I have Rinara run up and take position in Parry mode, which usually neutralizes Tiberius. I send Mantides in to take out the spellcasters as quickly as he can. Salazar is blasting away from a safe distance.
Charissa runs up and uses a carefully placed Word of Faith spell to catch as many of the Dukes as she can. This serves to render most of them helpless. She then follows up with two castings of Chain Lightning.
Soon only Hugie is left, but that in and of itself is a problem. He's content to simply remain in Hide in Plain Sight mode, which can force a player to reload if he or she has no resource to damage him while he's in his stealth mode. One option is to cast a cloud-damage spells (e.g. Acid Fog) over where he is. I show another way. Salazar has his Hellfire Shield activated, so he simply stands right next to Hugie to inflict considerable damage each round until the Halfling finally falls.
My reward is 7,500gp. I also get 2,000xp for winning every one on one fight and every group fight.
14th Level
And here is where everyone advances to their 14th level. A key point that I wish to stress is that Salazar now adds a single skill point to Craft Alchemy. There's a specific reason why that I'll explain very shortly.
Enchanting Angurvadal
I start off by making my way to the Undergate. I then go to the Drow Merchant at #2 on the Undergate map. I have Charissa cast Fox's Cunning on Salazar just before he accesses the Drow Merchant's inventory.
There are two items that I buy from the Drow Merchant. One is the Umber Hulk Mandibles. It can be distilled into a Weak Water Essence and a Faint Power Essence. That, however, requires a Craft Alchemy skill of at least 6. Salazar's own Intelligence of 16, the single skill point in Craft Alchemy he took during his 14th level up, and the Fox's Cunning spell from Charissa, is just enough to get him there. He further reduces the Weak Water Essence to a Faint Water Essence.
The other item that I buy is the Wraith Residue. It can be distilled into a Weak Air Essence and a Weak Power Essence. And again, that requires a Craft Alchemy skill rank of at least 6. I further reduce the Weak Power Essence to a Faint Power Essence.
I take the portal that leads to the Merchant Triangle, which is at #5 on the Undergate map. I then head to the workbenches in Mintassan's Mysteries.
I place Charissa's Angurvadal sword into the Magician's Workbench, along with the Emerald that I looted earlier from Hanna, plus the Weak Air Essence and a Faint Power Essence. Charissa casts a Light spell on the Workbench to raise the sword's enhancement bonus to +3.
Now I place a Diamond, as well as the Faint Water Essence and a Faint Power Essence, into the Workbench. Charissa then casts a Cure Critical Wounds spell on the Workbench to add +2d6 damage vs. evil to the sword. Charissa now has her weapon for the rest of the game.
Act 3 will begin in the Catacombs.