-

- Forums
- Chatrooms
- Gallery
- Gameplay Videos
- Upload
- Articles
- Mod Reviews
- Shop SP: Games, Movies, Books
 |
 Although the Entrance to Terikan's Tomb Enlarged Map shows lava flowing from the large statue in the middle of the hall, this will only happen once you have defeated Terikan so please do not be confused with the screen capture I have taken as I took it after I had defeated the Lich.
Otherwise, the entrance is the same and it is here you will come across Norlinor, a ghost whose rest has been disturbed by Terikan as well as the other inhabitants of this Dwarven Resting Place who walk and do Terikan's bidding. It is up to you to lay them to rest and to do so, you will have to defeat Terikan on his own turf. A task that may not be very easy for some but I shall do my best to guide you through it as I did when I first went through these darkened passages.
Speak with Norlinor and learn what you can of Terikan as well as what happened to Dorn's Deep many ages past and when you are ready, step forward through one of the passages and let us begin your venture into the heart of Terikan's Lair and slay this foul undead sorcerer!
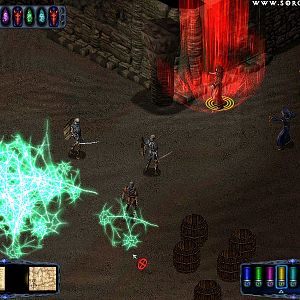
 Crypts line the walls of this resting place as do the walking dead who will move in to stop you from getting any further. My dwarven Cleric screamed at the top of his lungs to his deity and vowed to avenge those who had been woken from their eternal slumber, raising his holy symbol high he spat the words to return the dead to whence they came! Skeletons exploded, their bones rattled across the flagstone floor while Zombies kept their distance. Tears strolled down my dwarven friends face as he asked those in the front lines to use crushing weapons, as not to disfigure his comrades any more than needed. Nodding their head in respect, swords were changes to clubs, war hammers and maces as the Zombies were taken care of. The fury in my companions eyes roared and I knew that he would be the one would would deal Terikan his final death blow!
Directly up the stairs of this Tomb you will encounter Terikan for the first time, who will blast you down with his magics and summoned, animated dead corpses he will continue to send your way. Deal with him quickly for the longer you take, the more undead he will animate and bring into the battle, protecting him and prolonging his exposure to weaken your party.
As soon as he has been dropped, be nimble and be quick to search the crypts nearby as some items may very well help you in defeating Terikan and his foul minions. A rough hand touched mine as I reached for the first crypt, my dwarven companion looked me hard in the eye knowing that to loot would only disrespect him and his people who were laid to rest here. It is up to you if you wish to loot the places that the dwarves now rest, especially if you have a dwarf in your party. For respect to my companion, I left the items behind and helped him restore the lids to their proper positions and returned the bones of the skeletons as well as the zombies back to their resting place before heading onward.
The only item that my dwarven companion would let me take was TERIKAN'S KEY, which you will need also to open the door before you and gain entry into his Inner Tomb where the final battle will take place.
If you loot, don't take long for Terikan will return and you will have to battle him again and this will continue until you finally defeat him. For that, we will get to next.
As for strategy, I really didn't have one except that I attacked him with everything I had, surrounding his undead form and hacked away. Arrows are useless on undead for they deal no bashing damage so you're just wasting your arrows. Get in there, mix it up, take some hard earned damage and don't be a pussy wart by using ranged weapons for every battle. Ranged weapons are a sign of a coward, so I hope your whole party isn't equipped with them. My dwarven companion turned the undead that Terikan brought forth so the only threat was Terikan himself, who was quickly dispatched by the swing of a good fighters weapon and strength while my mage sat back and watched, for Terikan has a high resistance to magic.
 You have just found the Inner Tomb to Terikan's Lair, where other resting places also await thy exploration and battle veteran warriors. Terikan can be found at the very end of the chamber, but I suggest you explore each little crypt chamber on either side of the hallway and of course, always be quick to look for traps that are out to harm thee! Within the little crypts you will find treasure that will help you in the battle ahead, as well as helpful items needed to slay Terikan once and for all. If you recall, Norlinor spoke of TERIKAN'S PHYLACTERY which must be taken to Jamoth's Tomb when Terikan has been dropped by the party and by doing this, will stop him from regaining his power from the Phylactery and returning to fight you over and over again.
Now, to retrieve TERIKAN'S PHYLACTERY you have to make your way up the hallway to the forth crypt on your left side and I suggest you check Terikan's Inner Tomb Enlarged Map for the exact details and location to this item so you aren't wandering around getting yourself waxed by his evil minions. I found you are able to very easily sneak your way forward and explore the crypts up to the forth one without Terikan spotting you and sending in his swarm of undead to assault you.
The third tomb on the left side has a Greater Mummy nested inside which you should be ready for and also have some Cure Disease potions and spells on the ready in case one or more party members is touched by this foul creature. Send him back to whence he came and prepare thyself for the final battle against Terikan after you've snagged TERIKAN'S PHYLACTERY.
Other items of interest within the smaller crypts is EVAYNE'S JOURNAL who is the daughter of Larrel within The Severed Hand, the Lich who sent you here in the first place. As always, he is interested in knowing the final moments of his daughter and by handing over EVAYNE'S JOURNAL or at least the telling of it, will gain your party some extra experience with Larrel.
Upon the death of Terikan and after you take TERIKAN'S PHYLACTERY to Jamoth's Tomb, return to speak with Norlinor and tell him that Terikan and his minions have been put to rest, in which he will thank you for a job well done which will gain your party some well rounded experience and also tell you where the FORGE KEY can be attained.
You will also notice that the area itself has been brought back to how it once was as the forge now burns a bright, fiery red and within this forge you can find the FORGE KEY that will get you past the locked door within Terikan's Inner Tomb and also take you to our next Chapter, Chapter 5.
On your way back to the door that will lead you to Wyrm's Tooth, your advancement will be stopped by two very large Bronze Sentries who will do their best to bare you from going onward and it is best your front lines be wielding at least weapons of +2 or better to do any damage. Mages within thy party will have a hard time doing any damage to these Bronze Sentries for as the Lich Terikan, their magic resistance is high. Honestly, I didn't find them a problem and I bested them with my front line very quickly so I could continue to journey and adventure in solving the mysteries I had been sent out to find the answers for.
And like myself, you are ready to do the same so let us turn the page to Chapter 5.