-

- Forums
- Chatrooms
- Gallery
- Gameplay Videos
- Upload
- Articles
- Mod Reviews
- Shop SP: Games, Movies, Books
|
|
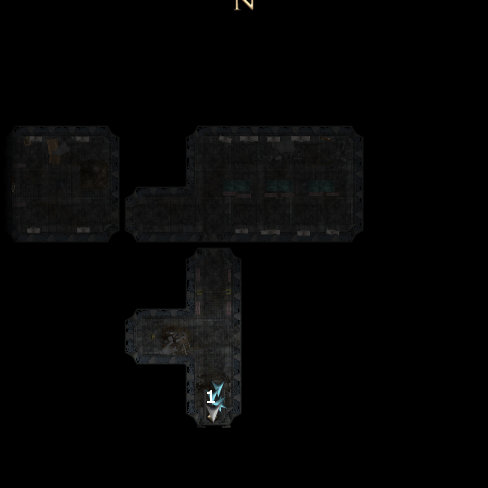
MIDDLE BARROW
Nikata
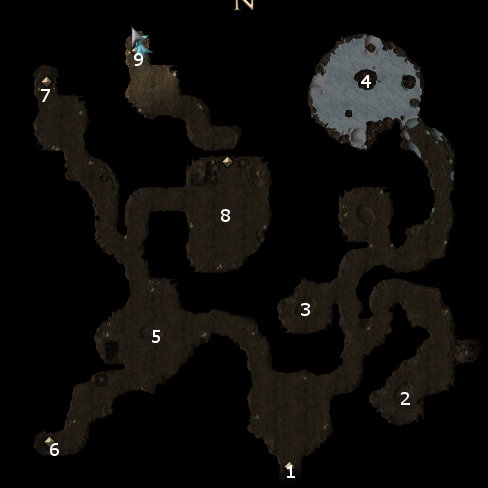
I emerge at #1 on the map. A cutscene ensues whereby the spirit hunger awakens and results in Valeria devouring the spirit wolf named Nikata.
Skin of Shadow
I begin traveling to the east, whereupon I have to fight a pair of Telthor Wolves. They're pretty easy as well.
At #2 will be a Telthor Bear, who is definitely a more difficult opponent. It hits more often for more damage, and takes a good deal more before going down. I therefore find it necessary for Safiya to help matters along with a pair of Isaac's Lesser Missile Storm spells. The nearby Ancient Offering Chest will have robes called the Skin of Shadow (+5 armor class, 24 spell resistance, Shadow Shield (13) 3 / day).
Telthori Totem
I back track and then go to #3. I find a Potion of Greater Heroism and a Telthori Totem (+5 to saving throws vs. mind-affecting spells, +3 Will saving throws). At some point I'll give the Totem to Okku so that it will improve his saving throws, but I keep it for the time being.
I continue north, disarm a trap, and then kill another Barrow Guardian.
Sacred Pouch
I press on to #4, whereupon I encounter a spirit of snow and ice called an Orglash. I could talk it into becoming my servant, in which case I get the Orglash Crystal (+100% cold resistance, -50% fire resistance, summon Orglash 1 / day). I'd just as soon kill it for the xp though. It is tougher than most of the other spirits in the Barrow, so Safiya expedites matters with repeated castings of Isaac's Lesser Missile Storm spells.
There will be a few items lying around, including a Star Sapphire, the Ring of Frozen Falls (+25% cold damage immunity, Hypothermia 3/day, Polar Ray 1/day), and the Sacred Pouch. The Sacred Pouch is potentially a quest item that can be used to make progress later on. I hold onto the Ring of Frozen Falls as a potential interim ring.
The video concludes with me tracking back to near where I first entered the middle Barrow.
Frost Harpoon
Now I make my way towards the southwest corner. I run into three more Barrow Guardians that surround Valeria. Valeria has little trouble taking them by herself.
An Ancient Wooden Chest at #5 holds the Frost Harpoon (Spear +4, +2d6 cold damage, keen), but I have no use for it.
The place at #6 marks the entrance to the Imaskari Forges.
Imaskari Forges
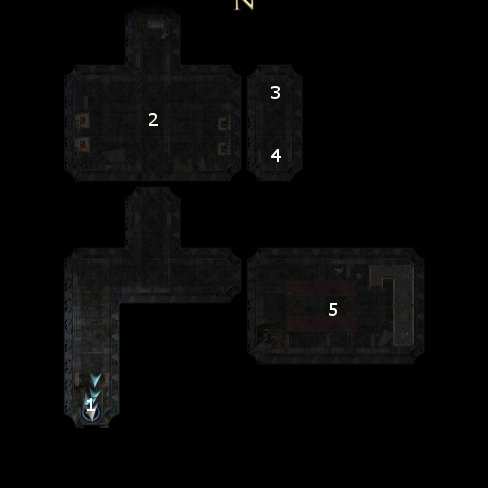
Valeria and Safiya pre-buffed themselves with Premonition, while Valeria has added on a Mirror Image for good measure. I start off at #1 on the map of the Forges, and go north until I'm just south of the door leading to the room at #2. Once through the door, there will be many animated weapons of various sorts that will attack. Here I show a tactical theme than can sometimes come in handy. I let Valeria hold them as they surround her. Safiya casts a two Cone of Cold spells over the whole lot of them, Valeria included. Valeria herself took no damage due to making her Reflex saving throw, and therefore Evading the Cone of Cold. They soon fall.
One of the chests will have three Adamantine Ingots, two Mithral Ingots, as well as Hellfire Powder that I'll be using very shortly.
There will be a few racks in the northeast corner of the room. One of the racks has magical ammunition of various sorts. The armor rack has the Hidden Breastplate of Imaskar (Breastplate +6, +10% acid resistance, immunity to poison), which Kaelyn will eventually wear as an interim armor. The weapon rack has a Longsword +3.
There will be a Blacksmith's Bench at #3 that will have:
The statue at #4 has the Imaskari Rod, which I'll be using very soon.
Imaskari Golem
Now I make my way towards the room at #5. There will be a several Imaskari Golems, but only one of them can be reactivated. I deliberately choose the dialogue options that involve making two Spellcraft checks in order to both reactivate the Golem and increase my influence with Safiya.
I then click on the Alchemist's Bench, and make an Alchemist check to create a Rejuvenating Salve with the Hellfire Powder I found at #2. I then talk to the Golem in order to use the Salve and improve its attributes. If you are unable to make the Craft Alchemy check, the Potion of Greater Heroism from the Middle Barrow can help make up the difference.
Imaskari Library
I return to the Middle Barrow and make my way towards the northwest corner. I have to disarm another trap and kill two more Barrow Guardians along the way.
At the place marked by #7 is the entrance to the Imaskari Library. The Library itself will have several Helmed Horrors that rely on physical attacks that can score extra fire damage with each hit. The first ones are spread about, so Safiya has to rely on single-target spells like Distintegrate and Polar Ray instead of area-effect spells. Afterwards a few of them bunch up westwards around the Imskari Golem, so Safiya starts to hit them with carefully placed Cone of Cold spells.
There will be several spell scrolls in the shelves of the library, including two scrolls of Avasculate, a scroll of Cacophonic Burst, and a scroll of Power Word: Petrify. Valeria inscribes the Avasculate and Cacophonic Burst scrolls.
Appeasing the Spirits ...
I return to the Middle Barrow and make my way towards #8. The door to the north is sealed. There are three ways to resolve this, and each one will earn a 1,000xp bonus.
Probably the least beneficial route is to place the Sacred Pouch in the chest beside the bear skeleton. It will mean no fights, but no xp either.
A second is to use the Imaskari Rod to smash the door. This will cause a Lich to appear. You can let the Lich go, or provoke it into a battle. The Lich is a fairly good spellcaster that will protect itself with illusionary spells like Greater Invisibility and Mirror Image before unleashing offensive spells. It's also worth about 280xp, plus the Imaskari Battlemage Armor (Mithral Chainmail +3, 10% arcane spell failure).
The third possibility, and the one that I did because it is the most beneficial in the long run in terms of xp, is to smash the bear skeleton. Four tougher than usual Barrow Guardians attack, who are worth about 400xp each. A tougher than usual Telthor Bear spirit then attacks, worth about 200xp.
I continue north, disarm another trap, and kill a pair of Telthor Wolverines.
The spot at #9 is the way up to the Upper Barrow.