-

- Forums
- Chatrooms
- Gallery
- Gameplay Videos
- Upload
- Articles
- Mod Reviews
- Shop SP: Games, Movies, Books
|
|
ACADEMY CLASSROOMS

Master Djafi
I start off at #1 on the map. At #2 will be Master Djafi, who will speak at length with both Valeria and Safiya. Since Safiya happens to be in the party, Master Djafi also gives me the Bracers of Artifice (+6 armor, +1 6th level arcane spell, +1 8th level arcane spell, +5 magic damage resistance). However, I prefer that Safiya keeps herself protected against ability and level draining through her other pair of Bracers, Gnarlthorn's Sacrifice. I also prefer that Valeria keep her Simbulmyn Bracers for its bonus feats.
Once the first conversation is over, I can ask him a few more questions at #3 if I were so inclined.
Lyonsbane Ring
In a vase straight ahead of where I just spoke to Master Djafi will be the Lyonsbane Ring (+15 to saving throws vs. death magic, Resurrection (13) 1/day). I place it in the Satchel. Three Pristine Water Essences and a Resistance spell adds +9 to saving throws vs. cold. Three Pristine Power Essences and a Legend Lore spell adds a bonus 8th level spell. Valeria has her other ring for the rest of the game. Another benefit is that she can now cast Ressurection, a spell normally unavailable to her particular build.
It is interesting to note that this ring also has a distinct advantage in comparison to items that have the immunity to death magic property. The Vampiric Feast epic spell ignores immunity to death magic, yet still allows a saving throw. This ring may therefore provide a certain protection against that particular spell that other items do not.
Skeleton Keys
I head over to #4, which is Master Inarus' classroom. He is willing to give me Inarus's Keyring in exchange for Valeria demonstrating her spirit eating abilities. I can either devour the soul of one of his bumbling students, Odjit, or insist on devouring an undead creature with Eternal Rest instead. I chose the latter. Note that any option will lose -15 influence with Okku, while refusing any demonstration will win influence with Okku. That's another reason why I switched out Okku for Safiya.
*Evil* Skeleton Keys
Zarathos on the other hand doesn't bat an eyelash at using Devour Soul on Odjit with glee.
Mysterious Device
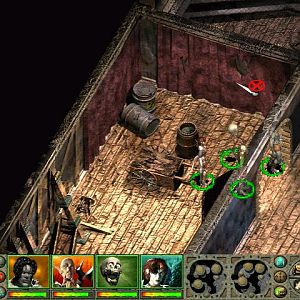
The party next goes to the room at #5. A few Red Wizards attack me. It can get pretty annoying if all of them use Etherealness on themselves and remain passive. The solution is pretty simple, an area-effect instant death spell like Wail of the Banshee or Vampiric Feast will still take care of them. One of the tables has the Club of Submission (Club +8, Fear DC=18 75% / 3 rounds, Disease DC=24 1d6 Strength).
On the other table is the Mysterious Device. I take the device outside because I don't want to damage some nearby undead monsters just yet. Using the Device on a Brilliant Spirit Essence gives Valeria the Malleate Spirit feat, which allows her to use Pristine Spirit Essences to add enchantments to items.
Malleate Spirit
Now I begin to make use of the Malleate Spirit ability. I begin by placing Kaelyn's Ring of Regeneration in the Satchel, along with two Pristine Spirit Essences. Malleate Spirit on the Satchel will a bonus 7th level Cleric spell to the ring.
After that, I place Kaelyn's Bone Ring into the Satchel along with one Pristine Spirit Essences. Malleate Spirit on the Satchel adds a bonus 6th level spell to the ring. This allows Kaelyn to add an extra spell with good choices including Blade Harrier, Heal, or Word of Faith.
After that, I place Kaelyn's Amulet of Natural Armor +5 into the Satchel along with three Pristine Spirit Essences. Using Malleate Spirit on the Satchel raises the Wisdom bonus I had added earlier to +9. The +9 bonus meshes with Kaelyn's Wisdom of 35, for a total of Wisdom of 44. That in turn means at least 3 bonus 9th level spells, and 3 bonus 8th level spells. Three Pristine Fire Essences and the Resist Energy spell adds +40 fire resistance as the amulet's fourth and last enchantment.
Now I place Valeria's Thayan Circlet into the Satchel. Three Pristine Spirit Essences and Malleate Spirit increases the Intelligence bonus I added earlier from +6 to +9.
I next place Valeria's Boots of the Sun Soul +5 into the Satchel. Three Pristine Spirit Essences and Malleate Spirit increases the Constitution bonus I added earlier from +6 to +9. Three Pristine Power Essences and the Fox's Cunning spell adds a +9 bonus to Reflex saving throws as the fourth and last enchantment for the boots. I repeat the process for Gann's boots as well, but with +8 Constitution instead of +9 since he has an even-number Constitution score as it is. I likewise add +8 Constitution to Safiya's Boots of the Sun Soul +4 as well.
Lastly, I place Safiya's Girdle of Guiding Light into the Satchel along with three Pristine Spirit Essences. Using Malleate Spirit on the Satchel adds +9 Strength to the belt as its fourth and last enchantment. This is more about carrying capacity for Safiya than anything else.
Astral Rodent Charm
I rest up and head back inside. First, I remember to use Malleate Spirit to raise the Constitution bonus of Safiya's boots to +8.
Now I make my way towards the room at #6. The door to it requires Inarus's Keyring to open. Valeria whittles down one of the Dread Wraiths by herself. Once it's 'Badly Wounded' but very close to 'Near Death, I have her peck it down just a little with an Acid Splash cantrip. Now it is 'Near Death', so Valeria uses her Eternal Rest power on hit.
The room itself has the Astral Rodent Charm (+1 dodge bonus to armor class, +4 Strength, -2 Intelligence). Just having the item in character's inventory will give the boost to Strength and another dodge bonus to armor class, but also the -2 penalty to Intelligence. Gann's holds it for now, but it will ultimately go to Okku once he rejoins the party. It's a rare opportunity for Okku to get a bonus to his already fearsome Strength score, as well as a dodge bonus to armor class. The Intelligence penalty will be meaningless for a straight Fighter.
Soul Depository
The room at #7 is the Soul Depository. The default rule is any visitor is only allowed to check one soul out of the Depository. Trying to leave with more souls than I'm allowed will trigger the Defense Mechanism, as this video shows.
The Soul Depository becomes relevant to more than one quest in the Academy, but that is for later.
Anhur's Edge
The room at #13 has Mistress Zerzura, but she isn't going to concern herself with me for the time being.
A crate in the room at #14 has Anhur's Edge (Falchion +7, +3d6 electrical damage), but I have no use for it.
Order from Chaos
At #15 is a Red Wizard named Sekhit, who's obsessed with successfully performing an experiment. She'll explain the experiment with enough persistent questioning.
At #16 is the experiment itself. It involves making sure that only Ice Mephits are on one side of the room, and only Fire Mephits are on the other side of the room. The switch in the middle of the room will swap the two nearest Mephits (whether Ice or Fire) so that they end up on different sides of the middle barricade.
Note that damaging the Obelisk or killing any of the Mephits will result in only a 2,000xp reward. Earning the full 4,000xp involves being patient enough to use the switch until you can get the Ice and Fire Mephits completely segregated from each other.
The reward for completing the quest is the Fragmented Soul, which is one of four souls that I'll need to make progress.
Golem Parts
I fight some more Red Wizard students at #17, whom I kill very quickly with physical attacks. A crate in the room has Weighted Golem Arms (+3, +5 damage, Improved Knockdown), although I for the most part will prefer the Shocking Golem Arms for the Golem I will soon create.
At #12 will be a few more Red Wizard students. It's pretty much a repetition of the previous fight.
At #11 is Master Atabe, but he won't concern himself with me for the time being.
A crate in #9 will have generic Golem Arms and Golem Legs.
At #8 is a room where Red Wizards construct Golems and have them fight each other. I will enter a Golem into the competition, but not until I find another part later on. For now, I loot the crate next to the door for the Construct Girdle (+12 Strength, -6 Dexterity, immunity to sneak attacks, immunity to paralysis, -50% blunt damage vulnerability). I already have strength-enhancing items for Gann and Kaelyn and Safiya, so I don't bother.
Master Poruset
At #10 is Master Poruset, whom Valeria and Safiya speak with for a while. He will be relevant to a quest later on, but not just yet.
A crate in the room has the Grips of Gond (+12 Craft Alchemy, +12 Craft Armor, +12 Craft Traps, +12 Craft Weapons), but by now I have pretty much everything I need in the way of items so I don't have any use for these gloves.
At #19 is the stairs down to the Instructors' Quarters.