-

- Forums
- Chatrooms
- Gallery
- Gameplay Videos
- Upload
- Articles
- Mod Reviews
- Shop SP: Games, Movies, Books
|
|
Church of Lathander Quests
Obid Teltas
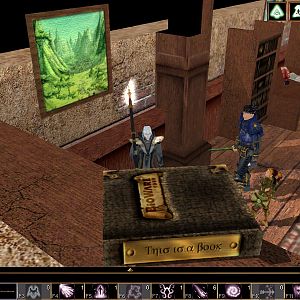
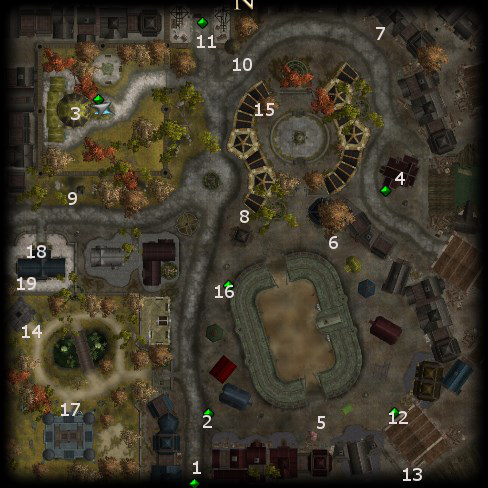
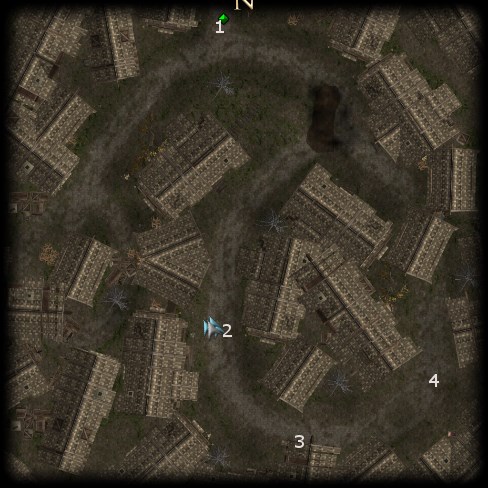
I make my way to the Morning Haven at #3 on the Arena District Map. I speak at some length with Obid Teltas. I also buy from him the Greater Cloak of Protection vs. Evil (+5 deflection bonus to armor class vs. evil) for Charissa, which will be her cloak for the rest of the game. Much like in the OC, almost everything I face in MoW will be evil, so the cloak serves as a handy +5 boost to armor class for a tank like Charissa.
*Evil* Selene will make a stop here as well, only to purchase the Cloak for Charissa before she throws her lot in with the Ebon Claws.
Hounds in the Night
I speak to Obid Teltas again, and ask him about the cursed mask in order to trigger the Church of Lathander line of quests. His first quest for me is to investigate the death of a priest of Lathander named Jeswick Salem.
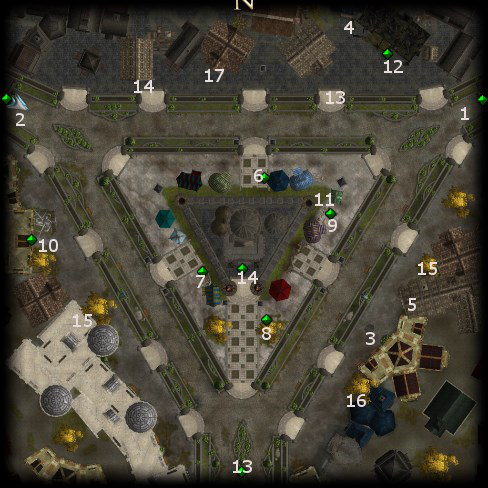
The entrance to Jeswick's house is at #15 on the Market Triangle map. Standing in front is Sergeant Wickers, who resists my attempts to gain entry until I bring up the cursed mask and being hired by Obid. I am then allowed to make entry.
Once inside, Wickers assumes that I'm an agent for the Night Masks who has infiltrated the Church of Lathander. I could try to play along, but it won't be very long until Wickers picks up that I'm legitimately employed by the Church. So I simply cut right to the chase. At that point, Wickers offers a 300gp bribe, which you can't talk him into increasing. Accepting the bribe increases influence with Rinara by +1, but loses -1 with both Charissa and Mantides. Refusing the bribe loses -1 influence with Rinara, but increases it by +1 with Charissa. I prefer the latter, since I value Mantides becoming a Paladin and don't want to lose influence with him.
Wickers then departs. The containers around the house have various items like a Healing Kit +1 and a Potion of Cure Serious Wounds. I inspect the dead body of Jeswick, and find a note that indicates his employers often conducted their activities in a place called the Warrens.
I next stop off at the City Watch Barracks, at #11 on the Arena District Map. I inform Captain Fennesh of Wickers being a turncoat for 50xp. I need to do this before completing the quest in order to get the 50xp. If I had accepted the bribe and then ratted out Wickers to Captain Fennesh, then my alignment would have shifted one point towards chaotic.
Next I tell Obid about the note I found on Jeswick's body. He informs me that the Warrens are south of the Harbor Loop.
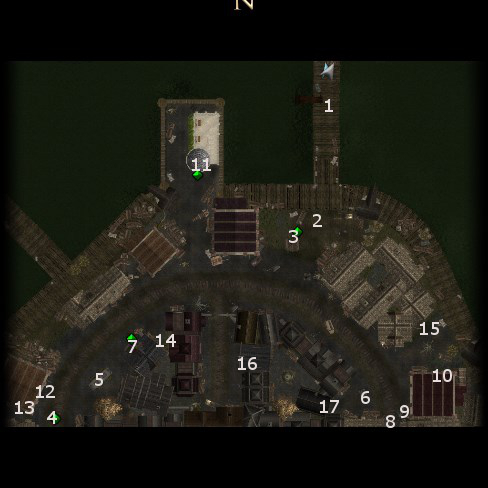
The entrance to the Warrens is at #8 on the Harbor Loop map. I need a guide for me to go ahead first. Nearby is Greveel, a rather disgusting beggar who brings me in after some dialogue.
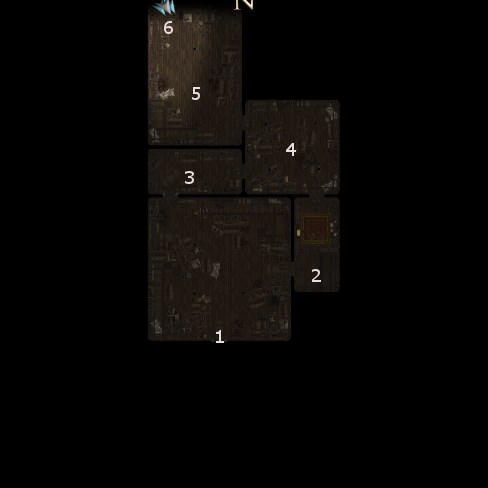
I start off at #1 on the Warrens map. Sergeant Wickers has some mercenaries attack me, but he himself gets scared off before the battle starts. I have Mantides head straight for the Mage in order to cut him down as quickly as possible. Charissa and Rinara hold up the others, although Rinara took a critical hit and went down partway through the battle. Salazar blasts away as always. The loot includes, besides a few random items:
Ahead at #2 I'll get attacked by a pair of Shadow Mastiffs, but they won't be hard to bring down.
At #3 is where I'll fight an enormous Shadow Wolf, which does take some hitting before finally going down. Greveel soon reveals himself as a Sorceress with purple robes who had been in disguise. She taunts me and then teleports away. Mantides has a moment of remembrance so to speak.
At #4 is the dead body of Sergeant Wickers. His corpse can be looted for a Cloak of Protection +2 and a Longsword +2, which I'll sell. And now I've done everything I need to complete the quest.
10th Level
And here is where the party advances to their 10th level of experience.
Now I sell off my extra wares to the Weapon Merchant, including the Cloak of Arachnida that Rinara had been wearing. After that, I make another trip to Mintassan's Mysteries.
I buy two items from Mintassan. One is the Boots of the Sun Soul +2 (+2 dodge bonus to armor class, Monks only) for Salazar. The +2 bonus to armor class stacks, and is certainly welcome for any character. Salazar can wear the Boots despite the class limitation owing to his Use Magic Device skill. The second item is a Cloak of Resistance +1 for Rinara. Better saving throws is always a good thing for any character, and in Rinara's instance it will also improve her use of her Evasion ability.
Assassination Games
I report what I discovered during the Hounds in the Night quest to Obid Teltas. My reward is 2,000xp plus an amulet called Lathander's Favor (Bless (2) 1 / day), which I'll just sell.
Obid then refers me to Captain Fennesh in the City Watch Barracks for my next quest. The short of it is that the Captain wants me to track a suspected Night Mask recruit named Darius Falgor. My initial lead is the Bent Mermaid Inn, at #4 on the Arena District map.
Darius is immediately in view once I enter. There's one of two approaches. One is to listen in on Darius without speaking to him directly, which will lose -1 influence with Charissa. The other is to confront him directly, which will gain +1 influence with Charissa. I chose the latter.
There's a chair in the Inn that's marked "Empty Table", which I click on in order to wait for Darius to get himself drunk and leave.
I follow after him once he leaves. We make our way towards the southeast corner of the district. The front entrance to the Cormaeril Company Sheds at #12 on map is locked. Darius, however, leads me to the back door at #13.
I follow in after him and start off at #1 on the Cormaeril Company Sheds map. What ensues is a cutscene that makes it apparent that the whole thing is a ruse whereby assassins employed by a group called the Fire Knives intend to cull some wannabe Night Masks, Darius included.
I end up having to fight a few Fire Knive Assassins. They're easy enough to kill in physical combat, although they do like to go after Salazar. Salazar now has the option of taking the heat off of himself with his Walk Unseen power when that happens. They leave behind random loot, plus a Sling +2 and an Adamantine Longsword.
At #2 will be several chests, with plenty of loot, including several healing potions that can come handy as I progress through the gauntlet that has been set up.
At #3 is the Fire Knife Assassin named Variak. He's pretty easy to kill, but it is worth noting that the room itself will inflict minor acid damage on party members each round. Variak will leave behind an Adamantine Shortsword and a Chainshirt +2.
At #4 is a room where Fireballs periodically go off. The party should be able to sustain only minor damage as long as they make their way through the room quickly and efficiently.
At #5 will be the Fire Knives leader along with several of his minions. Rinara is in her Parry mode, and positions herself to hold up as many enemies as she can. Charissa starts off with a Hammer of the Gods spell, and then wades into combat. Mantides is swinging away from the very start. Salazar is blasting away, and uses Walk Unseen if he's in danger of getting ganged up on. The battle is soon won. The leader leaves behind the Fire Knife Medallion (+4 Craft Trap, +4 Set Trap, Flare (1) - unlimited uses, Assassins and Rogues only), which I'll just sell.
The door at #6 leads open from behind and leads out to the front entrance at #12 on the Arena District map.
Golden Statue of Lathander
I return to Captain Fennesh with news of what happened and he rewards me with 300gp.
I then do likewise with Obid Teltas, and he rewards me with 1,250gp and 2,000xp.
He now has another quest for me, to defend an expensive Golden Statue of Lathander that he has commissioned from being looted by the Night Masks or anyone else.
I get transported to the Harbor Loop, whereby it's a three way fight between myself, alongside Priests of Lathander as Allies, against Night Mask Thugs and Wererats from the Ebon Claws who will fight each other and me at the same time. Mantides begins swinging away. Charissa uses both Hammer of the Gods and Call Lightning and then charges in. Rinara takes position to hold up as many enemies as she can while in Parry mode. Salazar blasts away over and over again. The battle is soon won, and I get a lot of the xp by landing the killing blows on the monsters instead of the Priests of Lathander.
Salazar gets another nightmare vision of Vampires after the battle, and finds that his Domino Mask (+10 hit points, -2 Concentration, Ghostly Visage (9) 2 / day) has become more powerful.
The main story continues by by making contact with Pentical Bleth.