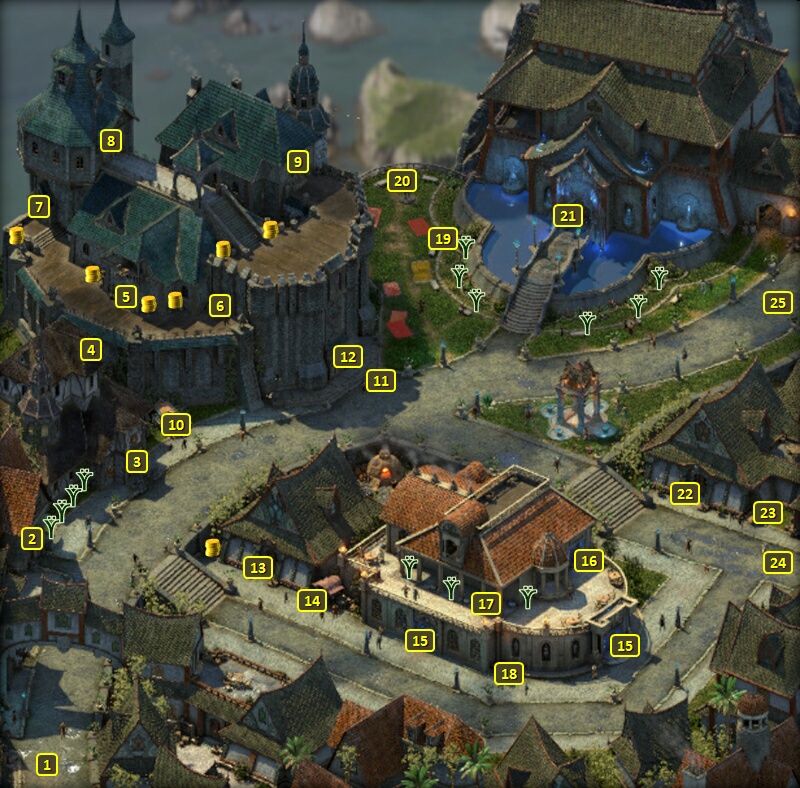
This Quest will start after completing the Huana Quest called From
the Wreckage.
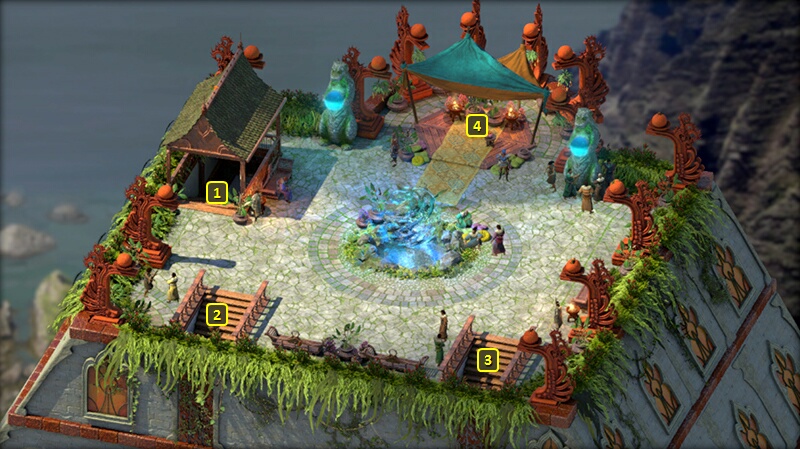
You will be in the rooftop
of the Kahanga Palace after an audience with Queen Onekaza after
completing the previous Quest.
This Quest starts off as a request from the Queen to check up on the
Watershapers, to make sure they are ready for any military efforts by
the Royal Deadfire Company.
If you want to do this Quest right afterwards, go down the stairs at
#1.
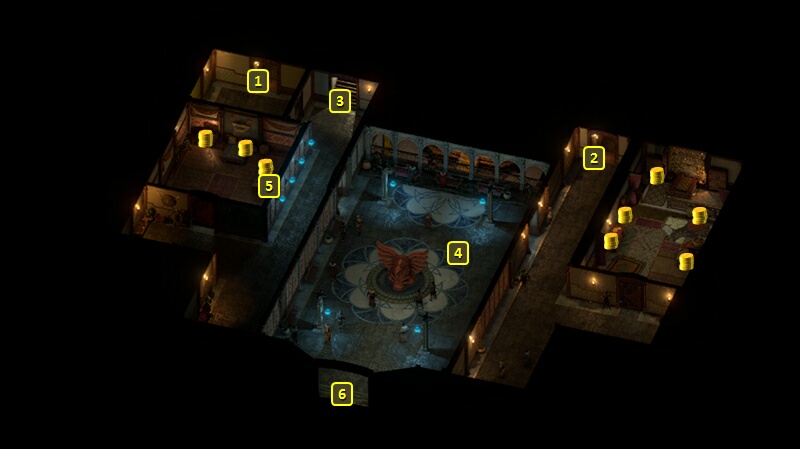
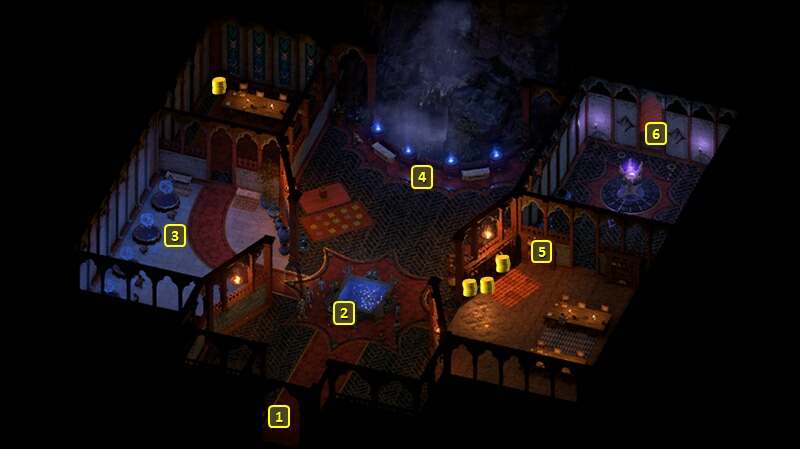
You'll start off at #1 on the map of the Watershaper's
Guild. The bodies of both Coral Nagas and Watershapers lay strewn
about.
You'll find a few Watershapers standing guard near the door at #6, led
by Eneku. Eneku will let you by without much hassle, and he'll inform
you that Mairu went downstairs to make a stand against the remaining
Nagas in the ruins below.
*NOTE* If you ever leave the Guild, the Dragon who is the focus of this
Quest will escape, causing the Quest itself to fail.
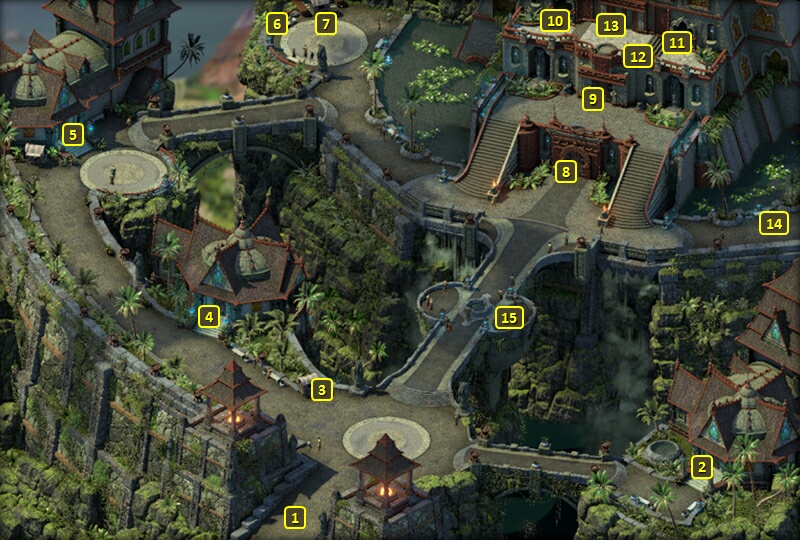
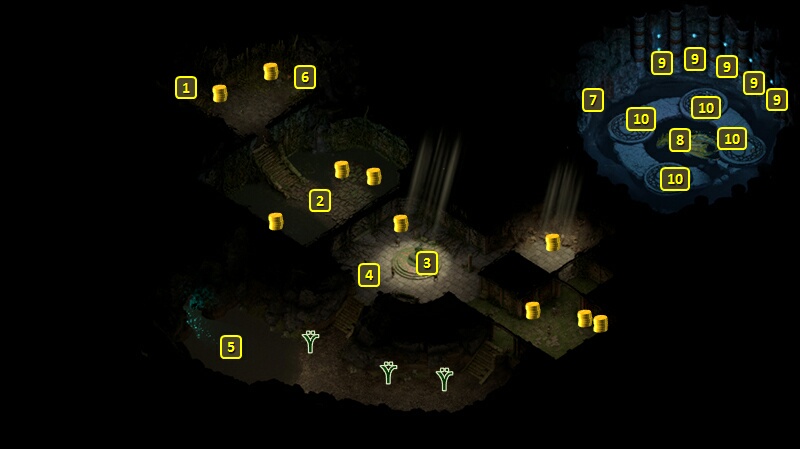
You'll start off at the door at #1. You will have to fight several
Coral Nagas and a few Lesser Bog Oozes at #2.
Periki's Tomb will be at #3. You'll have to fight several more Coral
Nagas here.
You can interact with the statue of Periki to get a sense of the
background for the Guild itself. The sarcophagus will have an
Exceptional or Superb Armor, and a random item or two as well.
Mairu will be at #4, and she is dying from her wounds from battling the
Nagas. She indicates that you'll need the Rod and the words to restore
the Guild. She dies partway through the words she meant to impart.
But then her spirit appears nearby. You can use your Watcher powers to
speak with her, and learn the words to a Watershaper prayer:
"Pitied is Ngati, Lady of Lament.
As the pearl orb of the heavens crosses her view,
Her eyes well with tears as constant as rain.
But the moon's skyward journey continues apace,
The lovers' affection as ephemeral as fingers touching."
It provides clues you'll need to complete the Quest. She then passes
away for good, with the parting thought not to let it escape no matter
what it says.
A large group of Coral Nagas will be at #5, led by Zihaa. Zihaa leaves
behind a Torc of Intellect
and the Rod of the Deep
Hunter. The latter item is needed for the Quest.
The door that Mairu was referring to is at #6. You'll need to touch it
with the Rod of the Deep
Hunter to expose the locking mechanism. It works by dialing it so
that a symbol is at the top, and then pressing that symbol. The
Watershaper prayer that Mairu taught you provides the clues for the
proper order, and is as follows:
Anglerfish
Moon
Rain
Moon
Hands
Now two things will happen. One, the Rod
of the Deep Hunter becomes an actual Rod that you can now use as a
weapon.
Second, the door opens and you'll be taken to the adjoining door at #7.
Here is the Sea Dragon,
Scyorielaphas, who is the focus of the Quest. You can talk to him at
length, and he'll explain that he was betrayed and imprisoned by Periki
ages ago so that his soul would empower the Watershapers of the Huana.
You can make a combined Metaphysics check of 5 and History check of 4 to
suggest that he can leave the piece of his soul that's been anchored to
the chamber. He can go free, and the piece of his soul that remains can
continue to empower the Watershapers.
He will be skeptical to begin with. A Bluff check of 3, Diplomacy check
of 2 or an Insight check of 3 will convince him. To pull it off, click
on one of the wards at points marked #10 and make a Metaphysics check of
9 to free him. He'll burst out of the ruins and return to the sea.
An obvious alternative is to fight the Dragon. If you betrayed Galawain
as part of your Pillars of Eternity 1 History, he will now interject and
announce that he's empowering the Dragon. The Dragon's breath weapon
works like the Boiling Spray spell in that it can inflict Burning Damage
and Push back multiple party members. He can also summon Water Whips to
help him.
If you defeat him, you'll have a choice between finishing him or sparing
him. He'll leave behind 5 Sea
Dragon Scales if you decide to kill him. They can be used to
upgrade armor, shields or weapons from Exceptional to Superb.
You'll have two possibilities if you choose to spare him. One is to free
him, leaving a piece of his soul behind, but without having to make any
skill checks. The other is to use the Rod
of the Deep Hunter to seal the wards and keep him imprisoned.
Suffice to say he'll really hate you if you make the latter choice,
although he can't do anything about it.
Return to Queen Onekaza. You will get about 14,000xp whatever the
pathway you took.
If you freed the Dragon but with a piece of its soul behind, or if you
kept the Dragon imprisoned, you'll gain major positive reputation with
the Huana.
If you killed the Dragon, or if you let it escape without leaving some
of its power behind, the Queen will be quite upset at you. It will
involve at least a moderate loss of reputation with the Huana.
You can take it even further if you're so inclined. Dialogue options
will available more than once afterwards whereby you can announce you
won't have anything further to do with the Huana. More losses of
reputation with the Huana will floow. Furthermore, the next Huana Quests
such as Fruitful Alliance
and Taking Out The
Traders will fail and no longer be available.
The next Quest, assuming you do not permanently end any relations with
the Huana, will be Fruitful Alliance.
Sorcerer's
Place is a project run entirely by fans and for fans. Maintaining
Sorcerer's Place and a stable environment for all our hosted sites requires a substantial amount of our time and funds on a regular basis, so please consider supporting us to keep the site up & running smoothly. Thank you!
Supporting Sorcerer's Place
Has Sorcerer's Place been useful? If you'd like to show your appreciation
for our hard work on the site, and help us pay the bills the site generates
every month, please consider helping support SP.
Thank you!

 Here is the Sea Dragon,
Scyorielaphas, who is the focus of the Quest. You can talk to him at
length, and he'll explain that he was betrayed and imprisoned by Periki
ages ago so that his soul would empower the Watershapers of the Huana.
Here is the Sea Dragon,
Scyorielaphas, who is the focus of the Quest. You can talk to him at
length, and he'll explain that he was betrayed and imprisoned by Periki
ages ago so that his soul would empower the Watershapers of the Huana.