-

- Forums
- Chatrooms
- Gallery
- Gameplay Videos
- Upload
- Articles
- Mod Reviews
- Shop SP: Games, Movies, Books
|
|
Origins | Ostagar | Lothering | Circle Tower | Warden's Keep (DLC) | Return to Ostagar (DLC) | Stone Prisoner (DLC) | Brecilian Forest | Redcliffe | The Urn of Sacred Ashes | Orzammar | Deep Roads | Denerim | Final Onslaught |
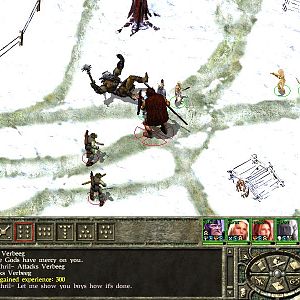
FORT DRAKON
Bluffing the Front Guards
I include in this video for interest's sake every possible character and dialogue option for having two companions trying to bluff their way past the front two Guards. Suffice to say that some (e.g. Leliana, Zevran, the Mabari Hound) are better at it than others (e.g. Oghren, Sten). I chose Leliana and Morrigan in my playthrough for reasons that I will soon describe.
Bluffing the Guard Captain
Once anyone successfully bluffs the first two Guards, they'll call their Captain. The Captain can also be bluffed past, and again some are better at it than others. I show all of the possibilities in this video for interest's sake. I had Leliana do the bluffing, with Morrigan at her side.
Once you do get past the Captain, you can then go south to the main hall of the fort. The soldiers there will remark on various matters, like how nobody misses Howe after he's dead, or the practicality of storing ballistae inside of a fort, and so on. Also within view will be Sergeant Tanna.
Sergeant Tanna
Here I show every possibility for trying to bluff Sergeant Tanna and get past her post. Alistair and Oghren fail miserably. Leliana, Morrigan, Sten and Zevran will succeed. The Mabari Hound can't even try.
Dog Kennel
I actually have a certain rationale for bringing both Leliana and Morrigan along. I can only bring two party members, so I need a pair that can handle large groups of enemies by themselves. Leliana can hit for massive damage, either up close or at a distance, and she has a very high defense rating which makes her hard to hit. Plus she can summon her pet Blight Wolf. Morrigan has a spell repertoire that is absolutely a recipe for mass destruction, plus she has Insect Swarm in her pocket. This part of the walkthrough also provides me an opportunity to showcase what her build is capable of.
I continue south, where I have to fight a few guards. Blood Wound is an absolute killer of a spell, since it works like a group Crushing Prison. It also has a very large area of effect, and won't hurt party members either. Morrigan's use of it not only turns the enemies into sitting ducks for Leliana and the Blight Wolf, it also buys her time to whip out a few more offensive spells like Cone of Cold, Winter's Grasp, and Curse of Mortality. She can then time transforming into a Flying Swarm for when the Blood Wound effect will end, rendering her safe against physical damage from the aggroed enemies as long as she has enough Mana.
I turn east, and then north. The Kennel Master and his Mabari Hounds charge me, but Morrigan dooms them in similar fashion with a sequence of Blood Wound, Cone of Cold, Winter's Grasp, and then Flying Swarm.
Freeing the Grey Warden
I continue north through two more doors. I then easily kill the Jailor and another Guard. Clicking on the chest just to the left will lead to the Grey Warden getting his equipment back once he's freed. The Jailor leaves behind a key, and Leliana soon uses it to free Aldarion.
Colonel
I now begin to fight small groups of Guards in the southern rooms of Fort Drakon, who are easy enough to kill. The Colonel leaves behind the Key to the Front Hall.
Front Hall
I continue north and past the main hall. The front hall leads to two rooms on either the left or the right. Sister Augustine is in the room on the left, and she's best avoided for convenience reasons. The Guard Captain is in the room on the right, and he's easily killed after the Blight Wolf does an Overwhelm on him. A chest in the room has the Key to the Reception Hall.
Reception Hall
The last room has quite a few Guards, but I take the opportunity to show how Morrigan can implement mass damage and crowd-control all at once. Two Guards will be right at the door, so Aldarion holds them in place with Cone of Cold. The other Guards are off to the side, so Morrigan starts off with Blizzard. She then follows up with Blood Wound. These two spells together will both inflict lingering damage and hold her victims in place. She then caps things off with a Death Cloud. This sequence can itself be just as deadly as a Storm of the Century or a Grease Fire. If the enemies were all in immediate view, it would be entirely appropriate to vary the sequence with Blood Wound first, then Blizzard, then Death Cloud. Should any happen to make it out, Morrigan will have time to turn into a Flying Swarm in order to meet the aggro. This is part of the reason why Shapeshifter and Blood Mage can be such an effective combination.
I then return to Arl Eamon's Estate.