-

- Forums
- Chatrooms
- Gallery
- Gameplay Videos
- Upload
- Articles
- Mod Reviews
- Shop SP: Games, Movies, Books
 |
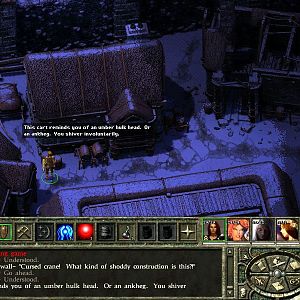
 Old buildings boarded up long ago along side of debris make this an interesting and enjoyable trek through what seems to be a deserted underground town. Barrels, turned tables, chairs, crates, wooden planks make much of the level along with Blind Minotaurs, Umber Hulks and Petrification Traps so do move about carefully. Chances are, you're going to breeze through the streets as the Blind Minotaurs fight rightly so and a few hard hits will bring them down quickly. Umber Hulks also linger around corners and in dark alleys and the only real threat they have is confusing your own party into attacking each other but due to the groupings, you'll only be facing two to three at most. There are a few Umber Hulks that use a surprise tactic of bursting out of the surrounding walls but once again, nothing that your party should have any difficulty removing.
Now because of all the debris littered everywhere, it is a pretty good place to put items you want hidden from others so I highly suggest you search all the crates, barrels and other small boxes very well for I found a good amount of scrolls here for my mage. Another very nice addition to my party was the Paladin sword Pale Justice and if you have a Paladin in your party as I did, this is a sword you will want to have and bring along for the final battle that you are very close to approaching.
This sword looks like an ordinary long sword and can be found on a dead body at a dead end of an alley way, which is the one that is right behind the place where 2 Umber Hulks blasted out from the earth. It'll seem you can't move behind the building but you can and there you will find the decaying body as well as Pale Justice. If you're not totally sure of where this is, please check the Lower Dorn - The Twisting Streets Enlarged Map for more details.
Clear the streets of any trouble and while doing so, do make sure you search for traps because there is a real nasty one waiting for the rushed. The traps can be all found on the circular white eye symbols drawn on the streets. When you feel you've gotten everything and killed everything you could, it's time to enter Malavon's Keep and get the 6TH BADGE.
Thanks to Alan for letting us know the exact location of these harmful traps.
 Finally! The last and final badge can be found here on Malavon and of course, gaining it is a great challenge because of the amount of foul beasts that you will have to slay while you battle Malavon himself! First though, this level is simply dotted with Gnomish slaves, their tongues cut out as they work quietly by themselves on whatever Malavon has them doing at the time of your arrival.
Now this battle is a lot of fun and I ran through it twice as I noticed the first time I needed some defensive spells to help me get to an easy victory but easy it is not, just helpful in the end.
Before you battle Malavon and speak with him, I suggest casting the following spells if you have them at your disposal.
The added saving throw and to hit bonuses you receive from the spells mentioned above will give your party better odds at making the saving throw against the Umber Hulks gaze because the last thing you want are all your fighters being hit by other party members as well as the foul beasts because they're all confused.
My mage also casted Summon Elemental and Monster Summoning 3 to help deal with the creatures that Malavon brings into the fray and this gave me more time for my main fighter to rid Malavon's dummy, who is not really Malavon himself as Malavon is waiting in another room.
Dimension Door, Web, Death Fog, Stinking Cloud, Flesh to Stone, Disintegrate and other deadly spells are just a handful of those you will encounter when you meet Malavon and he really loves to use Dimension Door as he jumps around the battle field casting Web and other area effect spells which will slow your party down.
Now once you've taken care of Malavon's dummy, they'll be some dialog explaining what has happened and he'll also comment about the Golems if you've taken care of them already along with the Summoned Monsters he brought forth against your party. The real Malavon can now be found and killed, but do be careful for he wields spells that give a nasty bite!
For myself, I had my mage go against him, one on one since an item I had found, I believe a robe or perhaps a cloak, if you removed it and put it back on again, it would continue to add magic resistance percentages to my mage, so by this time my mage had a magic resistance of 127% I don't recall what cloak or robe it was but I no longer had it at this point as I found something better suited for my mage, but I still had the benefits from previously wearing it.
Anyhow, weave after weave did my mage and Malavon go, until Malavon no longer had any spells left and moved in with his dagger to attack my mage, which I quickly brought in my Paladin and finished Malavon off once and for all.
Hopefully, this battle goes as good for you as it did for me. Double check everything and don't leave anything unturned for there are plenty of mage spells and items that can be found within Malavon's area, the most important ones being the 6TH BADGE and the SEEDS that Valestis is looking for from The Severed Hand.
You will also find an Anti-magic Potion (Oil of Null Effect) which can be used on Ginafae within Marketh's Keep to free Ginafae.
Susan, Matt and Modjahed, thanks for this heads up tip!
During the battle, you may come across a force field that will not allow you to leave and this will remain so until you slay the real Malavon so there won't be a chance to rest after you've taken care of those Golems. Slay Malavon and the force field will vanish, allowing you to finally leave and get on with your adventure.
Heads up to Matt, Mr Waffle, Steve and Fantom2301 for this information about the force field.
So now, if you've followed through this solution of Chapter 6, you now have all six badges and are no doubt dying and more than ready to face the foul evil that has plagued Kuldahar and the surrounding Icewind Dale area so without further ado, let us get to it!