-

- Forums
- Chatrooms
- Gallery
- Gameplay Videos
- Upload
- Articles
- Mod Reviews
- Shop SP: Games, Movies, Books
|
|
SHANDRA'S FARM
Track Ammon Jerro
I speak with Sir Nevalle again, and he informs me that Ammon Jerro has gone missing. I enter Crossroad Keep as well, where Aldanon tells me the same thing. Bishop is not at all sorry to see Ammon go, but offers to help track him down.
I put together a party that includes Casavir, Khelgar, Neeshka, and Sand. I end up back at Shandra Jerro's Farm.
Koraboros' Revenge
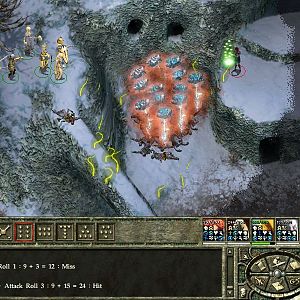
I do a few pre-buffs first, and then go on ahead. It becomes apparent that Koraboros seeks revenge and calls in a pair of Horned Devils to help him out.
The key objective is to take out Koraboros first and foremost. The reason being that if I go for the Horned Devils first, Koraboros will call more in even to the point of outpacing me and resulting in a veritable army.
First things first: Greater Invisibility for Valeria and Sand, Holy Weapon for Casavir, Diplacement for Neeshka via her Robe of Scintillating Colors, and Retributive Invisibility for Ammon Jerro. Khelgar charges right, and Casavir and Valeria soon join in. Neeshka tries to position herself for sneak attacks on Koraboros. Unfortunately, Koraboros hits the party with a Word of Faith spell, blinding most of them. Khelgar, however, managed to resist the spell so he can keep fighting. Ammon Jerro and Sand stayed out of the spell's range, so they can keep drilling the Pit Fiend with Vitriolic Acid / Eldritch Blasts and single-target spells. It gets easier after Sand tears down Koraboros' defenses with a Greater Spell Breach.
The rest of the party eventually manages to snap out of their blindness, and thereafter join in the attack. Sand finishes off Koraboros with a Polar Ray spell. After that, the party quickly takes down the rest of the Devils that Koraboros had summoned in.
Ammon Jerro's Remorse
Now an extended dialogue ensues. Getting him to admit remorse depends on choosing the right dialogue options, AND having accrued a high enough influence with Shandra beforehand. The prize is Shandra's Pendant (+4 natural bonus to armor class, +10 hit points, +3 saving throws, 20 spell resistance), which becomes Valeria's amulet for the rest of the game. She'll also import it into Mask of the Betrayer.
Koraboros himself will have left behind the Staff of the Magi (Quarterstaff +1, +4 deflection bonus to armor class, Shocking Grasp on each strike, 24 spell resistance, Magic Missile (9) 1/charge, Protection from Evil / 1 charge, Invisibility (3) / 2 charges, Web (3) / 2 charges, Dispel Magic (10) / 3 charges, Fireball (10) / 3 charges, Improved Mage Armor / 3 charges, Lightning Bolt (10) / 3 charges, Assay Resistance / 4 charges, Isaacs Lesser Missile Storm (13) / 4 charges, Stoneskin (7) / 4 charges, Wall of Fire (9) / 4 charges, Cone of Cold (15) / 5 charges, Lesser Mind Blank (9) / 5 charges, Lesser Spell Mantle (9) / 5 charges, 1 time use of retributive strike (6 x number of remaining charges of hit point damage to those caught in blast area), staff can be recharged by casting spells on it though if this brings charges to exceed 50 then staff will explode as per retributive strike). This becomes Sand's weapon for the rest of the game.
*Evil* Ammon Jerro's Remorse
Zarathos accrued awful influence with Shandra Jerro, so he doesn't even bother and instead keeps it short and sweet. Either the "I thought you might need help" or "You're the one who'se caused nothing but trouble" dialogue options will also lose influence with Ammon along the way. In any event, cutting things short leads to Ammon directly obtaining his Balafour's Gnashing Rod (see below).
Scarecrow
There are some good items to be found. One is in the crate at the side of what was once Shandra's house. It has Balafour's Gnashing Rod (Cold Iron Warmace +3, +1d4 fire damage, +2 Charisma, Combat Casting, Greater Spell Penetration, Flee the Scene 3/day, Hideous Blow without limit, Warlocks any). It's a decent enough weapon, and Ammon uses it for what's left of the game. He doesn't engage in melee combat very often in any event.
There will be a scarecrow on the north side of the field. A Search check or a Disarm Device check can reveal two chests. Keep in mind that the skill check required is pretty low, so something like a Greater Heroism or an Intelligence boost or Grobnar's Inspire Competence should be enough even for a character who hasn't put any skill points towards either Search or Disable Device.
The contents of the chests are:Ammon Jerro's Past
Now that I can make influence checks with Ammon Jerro, I can learn more about what he was up to before he became a joinable companion.
The war now focuses on the Outskirts of Crossroad Keep.