-

- Forums
- Chatrooms
- Gallery
- Gameplay Videos
- Upload
- Articles
- Mod Reviews
- Shop SP: Games, Movies, Books
|
|
VALE OF MERDELAIN
To the Vale
I hold a last conference with my companions, Lieutenant Kana, and Sir Nevalle, which leads to Aldanon using the Tome of Iltkazar to teleport Valeria and all of the playable companions. The destination is an enormous Illefarn ruin deep inside the Vale of Merdelain.
Once there, Qara and Sand resume their bickering. I choose the reply that loses influence with Sand but gains influence with Qara. Another group discussion ensues, with the end result that Neeshka has disappeared.
I now have the opportunity to reset the party. Ammon Jerro and Zhjaeve are mandatory. I have two left to choose. The key consideration for me is that I only get to rest once after I've selected the party. I won't be able to rest thereafter. I therefore want party members who are durable and can tough it out over the long haul. My first choice was Casavir, who is an awesome tank that can dish out lots of damage, also has his Ring of Regeneration, and has great saving throws. My other choice is Khelgar, and for similar reasons. And indeed Khelgar's massive damage output, further enhanced by his +2d6 fire damage that will burn the undead, will really come in handy.
Once I've selected the party, I grab the opportunity to configure my spells and rest up. The party now puts up its long-lasting buffs. It's Greater Stoneskin and Greater Magic Weapon and Extended Heroism for Valeria. It's Greater Stoneskin and Improved Mage Armor for her Beetle Familiar. Casavir casts Bless Weapon on himself, Valeria, and Zhjaeve. Zhjaeve casts Magic Vestment on her armor and shield. She also casts Death Ward on both herself and the Beetle Familiar. Ammon Jerro also uses Dark One's Own Luck and Leaps and Bounds on himself.
*Evil* To the Vale
The parallel video for Zarathos. One difference is that Zarathos says that the Tome worked in order to gain influence with Sand, but lose it Qara.
Another difference shows when Casavir brings up the subject of Bishop's treachery. Zarathos replies that Bishop's betrayal may not have been willing, which loses yet more influence with Casavir. Casavir then takes the opportunity to express disgust with Zarathos, the first manifestation of Zarathos' very low influence with Casavir.
Bone Spiders
The first challenge will come as soon as any character makes enough progress on either the right or left side gangway. The encounter itself involves a LOT of Bone Spiders, each of which will swarm the nearest party member. They're also capable of poisoning their targets.
My approach was to have the two most resilient characters (i.e. most hit points, highest armor class, best fighting ability, best Fortitude saving throws), Casavir and Khelgar, go off to either side by themselves. The idea is that they're the most likely to withstand getting ganged up by several Bone Spiders. The strategy makes it easier for the other party members who face fewer Bone Spiders at any given time. The strategy is a complete success as the party pretty much emerges unscathed.
Skeleton Archers and Dread Wraiths
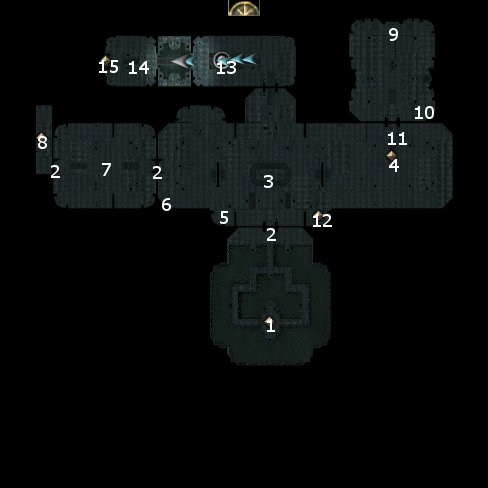
Valeria brings the party up close to the door at #2. She then issues a 'stand your ground' command. Next, she disarms and unlocks the door. Then she casts Greater Heroism and an Extended Greater Invisibility on herself.
There will be a lot of both Skeleton Archers and Dread Wraiths on the other side of the door, and down the stairs to both the left and the right. There will also be plenty of traps as well. The go invisible and disarm traps trick has only partial success here. It allows her to disarm the traps at the top of the stairs without hindrance. She goes down the stairs to the right. Her cover gets blown once she starts down the stairs, meaning that she's close enough for the undead to notice her. She therefore races straight for the trap at the bottom of the right-hand stairs. She disarms the trap and then issues an 'attack nearest' command in order to bring in the rest of the party. There's another trap in the middle of the room that can be difficult to disarm, and actually fairly easier to set off, so maybe a reload or two will be necessary. The undead become pretty easy to kill off once these initial steps are taken.
The party then goes through the next door to the right, with Valeria disarming another trap along the way. I step into the black fog at #4, and get teleported to #5.
*Evil* Spirits of Daerred's Adventuring Company
Note that Zarathos previously sent Daerred and the rest of his novice adventuring company to their deaths through the wrong choice of quest. They will appear at #6 after I go through the black fog at #4. They're pretty easy for any high-level party to kill.
Blade Golems
I go west, disarming a few traps along the way. There is another door to the west that needs to be disarmed and unlocked. There will be several Blade Golems on the other side at #7. They can inflict hefty damage, so I take no chances. Ammon Jerro protects himself with Retributive Invisibility, and then goes to work with Beshadowed Blast / Eldritch Chains with the intention of blinding the Golems. Zhjaeve hits all of them with a Word of Faith spell once they close in. I then have little trouble taking down the Golems in straight physical combat after making suitable preparations.
There will be another trapped and locked door to the west. On the other side will be a black fog at #8 that teleports me to #9.
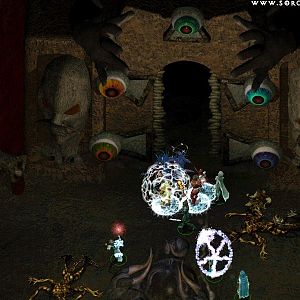
Nightwalker and Greater Shadows
The room at around #9 has a LOT of Greater Shadows that need to be killed off. One group will be off to the corner to my left.
After that, I notice a Nightwalker at a distance in the middle of the large room. Ammon Jerro starts to get in some early blows with Vitriolic Acid so that it is weakened by the time it reaches me. I then have little trouble finishing it off.
There will be plenty of traps as well as several more Greater Shadows on the other side of the room. Valeria disarms any nearby traps after the battle is done.
Lich
At #10 will be a Shadow Priest helped out by a few Vampire Rogues and a few Elite Vampires. I have Khelgar use his running speed to single out the Priest first and foremost. What you want to avoid is the Priest getting off a Word of Faith spell. It has no saving throw, so it will blind multiple party members unless spell resistance checks are made. Blinded party members can sometimes be enough to tip the fight in favour of the enemy, or at best prolong combat far longer than is really necessary. I have Khelgar stay on top of the Shadow Priest so that he can't get off his spells. The rest of the party goes to work on the Vampires, with Zhjaeve helping matters along with a Word of Faith of her own.
Another Shadow Priest, a couple more Vampires, and a Lich turn up to the east. I again have Khelgar make a b-line for the Priest, and for the same reasons. The rest of the party goes to work on the Lich. It is protected by several buffs, but ganging up on it gradually wears it down. There will be another teleporter at #11.
Mummy Lords
Zhjaeve casts Spell Resistance on the Beetle Familiar, because a magic-intense battle is about to come up.
The teleporter takes me to #13, whereupon I'm immediately plunged into battle with several Mummy Lords. It should be pretty routine to physically overwhelm them, as long as I can resist their spells either through saving throws or spell resistance.
Three Shadow Reavers
Valeria readies herself with an Extended Greater Invisibility and an Empowered Mirror Image. She also casts an Extended Haste on the party. The party then goes on ahead to #14, where they have to fight three Shadow Reavers at once.
Zhjaeve leads off with an Extended Battle Tide, while Ammon Jerro starts off with a Retributive Invisibility.
The strategy is simple. Casavir happens to be in the rear, so I send him straight after the Shadow Reaver that's behind me. Khelgar and Valeria then charge straight forward and stay on top of the other two Shadow Reavers. The tactic ensures that both Ammon Jerro and Zhjaeve are at a safe distance so that they can use their True Name scrolls on each of the Reavers.
A complication arises in that one of the Shadow Reavers unleashes a Word of Faith, which blinds almost everyone in the party, including Zhjaeve and Ammon Jerro. That means they can't target the Shadow Reavers with their True Name scrolls. Zhjaeve casts Remove Blindness in a small area so as to cure both Ammon Jerro and herself.
Ammon Jerro uses his True Name scroll on the Shadow Reaver facing Casavir. Casavir is able to quickly bring down the Shadow Reaver after the incantation is completed, and is afterwards able to regroup with the rest of the party and strengthen their assault on the other Shadow Reavers.
Zhjaeve in turn uses her True Name scroll on the Shadow Reaver attacking Valeria and Khelgar. However, Valeria and Khelgar have both been taking a beating. So Zhjaeve rushes forward after the incantation has been completed, and uses a Mass Heal which simultaneously restores Valeria and Khelgar to full health, and finishes off the green Shadow Reaver.
The third Shadow Reaver falls easily after Ammon Jerro uses his own True Name scroll on it.
The Reaver that was behind me leaves behind an Amulet of Will +6, which will become Elanee's amulet for the rest of the game. The Reaver in the green robe leaves behind the Venom Halberd (Halberd +2, poison DC=16 1d2 Constitution damage). The last Reaver leaves behind the Staff of Power (Fireball (5) / 3 charges, Magic Missile (5) / 2 charges, Ray of Enfeeblement (2) / 1 charge, Sorcerers or Wizards only). I have no use for either item.
At #15 is the entrance to the Inner Sanctum.