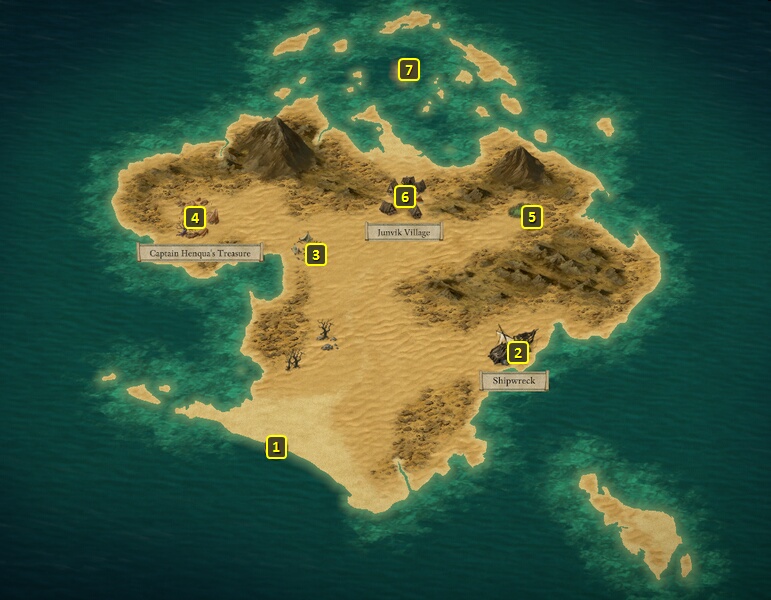
Tatok will be at #6 in Junvik
Village. The Quest begins when you indicate a willingness to save
his son, Kaali, who is slated to become the next sacrifice to a being
named Nemnok.
There are multiple points of entry. Going towards the eye sockets to
explore the Crown level is not necessary to complete this Quest, but
there are some notes to be found that can provide helpful information.
You can also obtain items that you may find useful, and one item in
particular can help you reach your ultimate destination in the game.
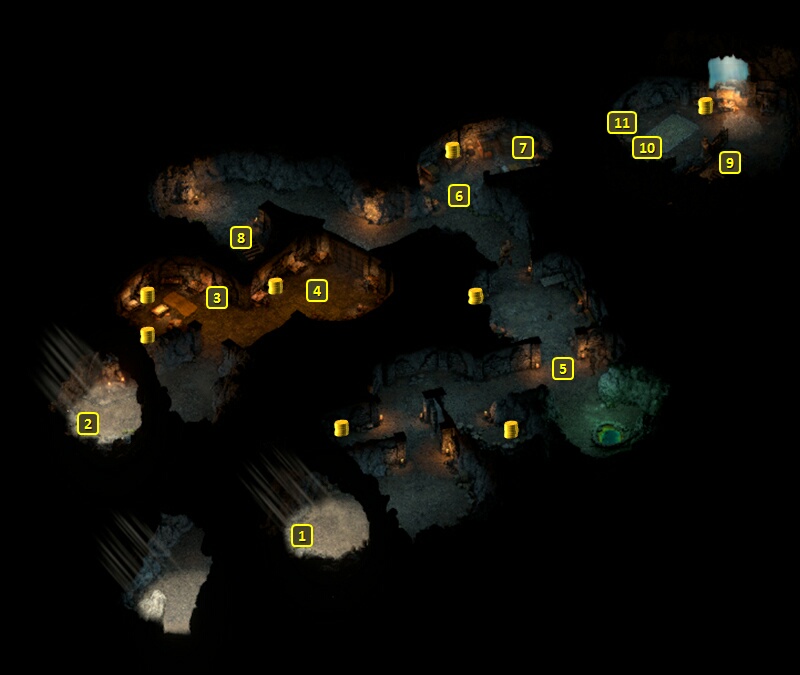
Going through the right eye socket allows you to enter at #1 on the
Crown level.
Going towards the eyes and going through the left eye socket allows you
to enter at #2 on the Crown level. But you either have to spend a Rope
and Grappling Hook, or have everyone make an Athletics check of
12. Party members who don't make the check will sustain the Twisted
Ankle (-20 Reflexes) Injury.
Going through the mouth brings you to #12 on the Base Floor.
Going through the right eye socket to start at #1 means having to
disarm the traps to the near east of the socket.
It also means having to fight the Eotens, Barrow Guards and Scrivenes
at points #5 and #6 right away.
A possible benefit of coming in through the socket is not having to
expend any items or make any skill checks to gain entry.
The left eye socket would bring you to #2. Acolyte Kinnuq will be at
#3. His initial inclination is for him and his fellow Scriveners to go
hostile and attack you. If you want to avoid a fight, you can either
indicate a desire to ask questions generally followed by a Bluff check
of 20, or ask about Kaali followed by either a Diplomacy check of 16
or an Intimidate check of 13.
Keep in mind that the monsters at #5 and #6 will still be hostile.
The table at #4 has Kinnuq's
Memo, along with another random item or two. The memo itself
alludes to the "master's favorite cloak".
The table at #7 has A Note
on the Forge, which alludes to a need to stay away from the Naga
in the level below who are led by a Forgemaster.
There stairs at #8 lead down to the stairs at #13 on the Base Floor.
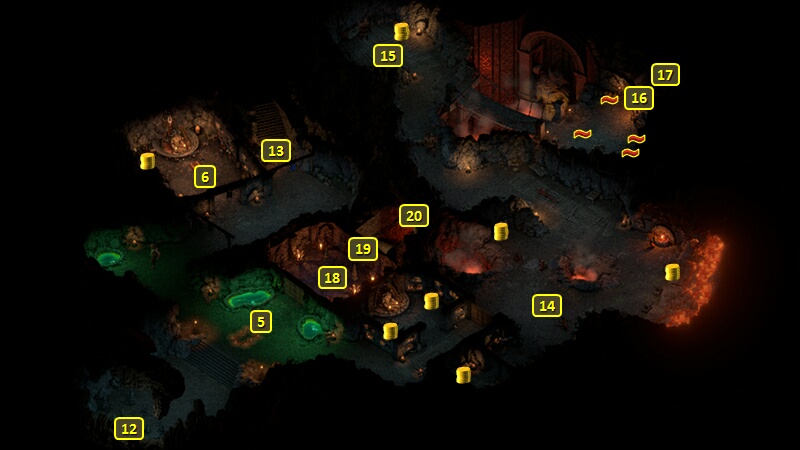
You can come to the Base Floor either by coming down the stairs at
#8 on the Crown, or going through the mouth from the North
Island. There will again be plenty of Eotens, Barrow Guards and
Scriveners to fight.
There will be numerous hostile Flame Naga to fight at #14 led by
Forgemaster Tythus. You can complete this Quest without this fight and
the next fight as well, but doing so can make it easier to get past
the room at #18. It can also lead to obtaining some items you may
helpful, including the one that can help with the Main Quests.
A few Eotens will be at #15, led by Deathwarden Latuc. Latuc himself
will leave behind a Sigil
of Death Wardstone, which may be useful in the room at #18.
There will be numerous traps leading up the door at #16. The door
itself is opened by finding a hidden button just to its left and
behind the Lamp Oil Barrels with a Perception check of 10, and then
pressing it.
The stairs at #17 lead to #9 on the map of the Crown.
The crate at #10 on the map of the Crown level has Nenmok's
Cloak.
The crate at #11 on the map of the Crown level has a Blackwood
Log in it. Having five of these logs can help build your ship in
a way that it reach the ultimate destination of the game.
Return to the Base Floor and go to the room at #18. This room is
loaded with both traps and a pair of Sigils of Death. The Sigils can
inflict Injuries each time they pulse, which can quickly lead to
permanent death.
Getting the Sigil of Death
Wardstone from Deathwarden Latuc at #15 and using it can protect
you from the Sigils.
The door at #19 can be opened after a Perception check of 10 reveals
that the horned skull to its left is a switch, and then hitting that
switch.
This stairs at #20 lead down to #21 on the map of the Sanctum.
The Sanctum itself is
filled with Barrow Guards, Scriveners and Eotens throughout.
Nemnok's pit is at #22, with Kaali as one of the supplicants in
worship beside it. Kaali will at some point notice you, but the
dialogue inevitably leads to Nemnok appearing out of the Pit.
It is quite easy for the encounter to end with hostilities. Keep in
mind that should Kaali die without being freed from Nemnok, you can still complete the Quest but without all of its possible rewards.
One way to secure Kaali's freedom is to question Nemnok directly about
being an Imp, following that up with a Diplomacy check of 16, and then
agreeing to Nemnok's request to acquire Grimoires from especially
powerful Wizards for him. That triggers The
Lost Grimoires Task. Nemnok then releases Kaali, who promptly
departs. Nemnok also gives you Nemnok's Decree, which vaguely describe the locations where the Grimoires can be found.
Completing that Quest makes it possible to acquire the items from the
chests at #23 through willing exchanges. Those items are:
Trying to get those items out of their chests but without Nemnok's
permission as part of The Lost
Grimoires Quest will result in Nemnok and all of his minions
turning hostile. And that's even if you previously came to an
understanding with Nemnok to start The
Lost Grimoires Task.
If you want to save Kaali but in more violent fashion, you need to
make an Intimidate check of 18 to convince Kaali to abandon Nemnok. If
you make the dialogue check, stay in dialogue until Kaali has
completely left the Sanctum. Clicking on the ensuing dialogue options
too quickly can result in Kaali still being in the room, forcing you
to kill him and failing the Quest.
Nemnok himself has a LOT of Health, aside from having a lot of minions
in the sanctum to help him out. Keep in mind that he also likes having
Arcane Reflection on himself, so trying for example Disintegration on
him can backfire badly. The herd around him is decidedly easier to
thin out, so wipe them out and save him for last when he's by
himself.
He had been relying on an amulet he stole from Arkemyr to give him
greater size and power, but will get reduced to the size of a regular
Imp since defeating him also destroys the amulet. You will have a
choice once you've defeated him. You can either kill him permanently,
or accept Nemnok as a Pet.
Either choice fails The Lost
Grimoires Task.
Return to Tatok in Junvik Village. He'll reward you with 5,000+ xp, 500cp and the Hearth Defender's Scale if Kaali returned alive. You'll get the other rewards but not the armor if Kaali died while you fought Nemnok.
Sorcerer's
Place is a project run entirely by fans and for fans. Maintaining
Sorcerer's Place and a stable environment for all our hosted sites requires a substantial amount of our time and funds on a regular basis, so please consider supporting us to keep the site up & running smoothly. Thank you!
Supporting Sorcerer's Place
Has Sorcerer's Place been useful? If you'd like to show your appreciation
for our hard work on the site, and help us pay the bills the site generates
every month, please consider helping support SP.
Thank you!

 The Sanctum itself is
filled with Barrow Guards, Scriveners and Eotens throughout.
The Sanctum itself is
filled with Barrow Guards, Scriveners and Eotens throughout.
