This Quest is given by Master Kua in the Crookspur
Fort. Doing this Quest will also help towards completing the
Principi Quest called A
Shrewd Proposition in a way that favors Captain Furrante.
Be forewarned that completing the Quest means failing the Royal Deadfire
Company Quest called Clearing
Out Crookspur and the Cruel Cargo
Quest. It will complete the Huana Quest called Fruitful
Alliance but in a way that ends the possibility of any continued
alliance with the Huana.
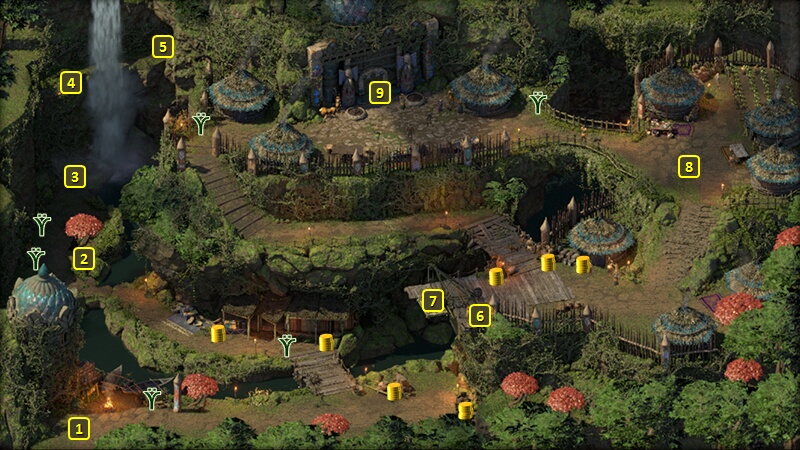
You'll start off at #1 on the map of Oro
O Koiki when you first arrive. One method is to slaughter everyone in sight, both here and in the Ori
O Koiki Sanctum, the entrance to which is at #11.
Another method is to kill only their
three leaders and then leave the village when you're done. That depends
on entering the village as a welcome visitor.
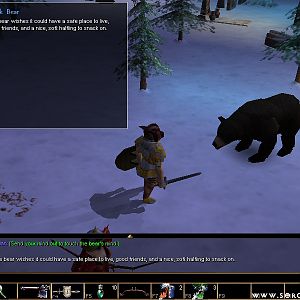
Be sure to pick up the Infested
Koiki from the tree at #2 before you begin.
Go to the cliff at #3, which can lead to #4. A Survival check of 3
will alert you to a wasp nest that needs to be avoided. Trying to climb
without the check results in the Fatigued (-5 Accuracy, -10 all
Defenses, -15% Maximum Health) Injury for all party members.
Next, you'll need to send someone to scout ahead for the best path. The
party member you select needs to make a combined Athletics check of 5
and Survival check of 4.
Making both checks brings the party to #4. Making the first check but
not the second results in the party reaching #4 but with the Fatigued
Injury. Failing both checks means remaining at the bottom and with the
Fatigued Injury.
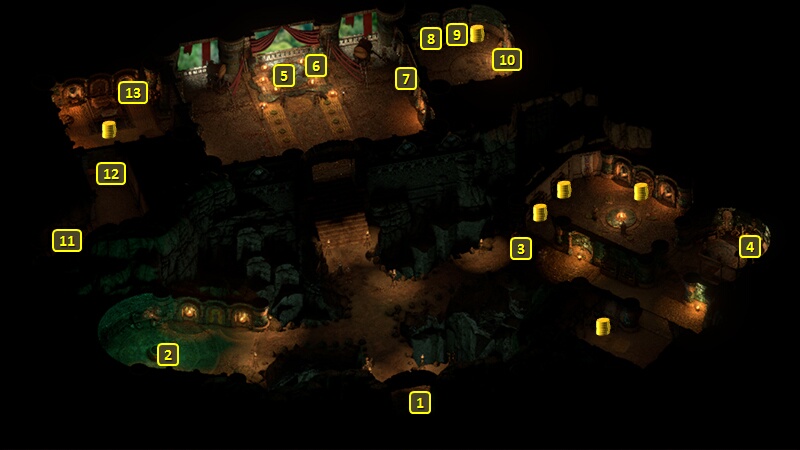
The tunnel at #5 leads to the Ori
O Koiki Sanctum at #11. The door at #12 can be opened by using the
lever to the right of the door. The point of doing this now is that you
cannot open the door from the other side to the north. Doing it now
creates an escape route once the Wahaki leaders are taken care of.
Plant the Infested Koiki in
the bowl at #13. Now go back out the door at #11 to return to the
outdoors of the village.
Kipeha will be at #6 on the map of Oro
O Koiki. She acts as the gatekeeper for whether you can enter the
village as a welcome visitor, and can grant permission to
use the lift at #7 to enter the village.
You can convince her to let you use the lift and enter the village with:
Paying 1,500cp as an entry fee, after the intiial offer of 1,000cp
gets refused.
Making either a Diplomacy or Insight check of 8. Any subsequent
checks won't matter.
Making a Bluff check of 9.
If you started the Fruitful
Alliance Quest, mention that you come on behalf of Queen
Onekaza and follow up with the words "Over crumbling mountains,
across blighted seas". If you mention the Queen, but don't use the
passphrase, Kipeha will fire an arrow at you and turn the village
hostile. An Athletics check of 7 dodges the arrow.
If you started the Cruel Cargo Quest, mention that the Crookspur Slavers seek
revenge. Any subsequent checks won't matter.
You can then use the lift at #7 to enter the village.
Kipeha will often be at #8 afterwards if she allowed you entry into
the village, at least during the daytime. She now sells several items,
most of them being crafting ingredients. The one distinctive item that
she does sell is a Ring called Kaura's
Prize.
The main entrance to the Ori
O Koiki Sanctum will be at #9. A couple of locals, Aparo and Auta,
will have an argument about how welcome you are in the village (if you
came as a welcome visitor). Aparo is also willing to answer questions to
provide background information.
You'll now be at #1 on the map of the Ori
O Koiki Sanctum. Go north to #5, and have an audience with Ranga
Ruasare. You could, if you wish, select the Aggressive dialogue option
to start a fight against her and the rest of the Wahaki then and there.
Slaughtering the entire tribe would complete the Quest just as well.
If you still prefer to be sneaky about it, wait for most of the
attendees to retire from the Throne Room.
A brazier will be at #2. Buparo will go back and forth between here
and the throne room after the initial meeting with the Ranga.
The Brazier itself presents an opportunity to kill Buparo by planting
any Bomb in it. Doing so requires that
the character that clicks on the brazier make a Sleight of Hand check of
5.
Tangara and his Rusted Construct can now be found at #3. He will
express frustration at not being able to make the construct obey his
commands. You can convince him to let you try with either an Athletics
check of 4, a Bluff check of 6, or a Metaphysics check of 5. He'll then
give you the Construct Command
Scroll.
Now click on the Construct itself. You'll need to make a Metaphysics
check of 6 to clear its memory, then give it instructions to kill
Tangara.
Ranga Ruasare may spend some time on her throne before leaving for her
chambers. You can use the Wait option to expedite her consuming the Infested Koiki and choking on
the worms. You can then go to her chambers at #13 and loot her body for
her spear, Kahua Hozi.
The rest of the village will go hostile if you kill the leaders and
leave the Sanctum. That was the point of opening the door at #12 from the south if you wanted to complete the Quest in a sneaky assassination kind of way. Now you can simply go through the door at #11, go down the cliff, and leave the village without anyone noticing.
Return to Crookspur Fort and report your success to Master Kua. You'll get 15,000+ xp as a reward but not much else to conclude the Quest.
Sorcerer's
Place is a project run entirely by fans and for fans. Maintaining
Sorcerer's Place and a stable environment for all our hosted sites requires a substantial amount of our time and funds on a regular basis, so please consider supporting us to keep the site up & running smoothly. Thank you!
Supporting Sorcerer's Place
Has Sorcerer's Place been useful? If you'd like to show your appreciation
for our hard work on the site, and help us pay the bills the site generates
every month, please consider helping support SP.
Thank you!