The entrance to Sanza's Emporium is at #20 on the map of Queen's
Berth. Getting this quest requires that you first complete the Mapping
the Archipelago: Port Maje Quest. Now he wants you to find a trio
of islands surrounding Tikawara.
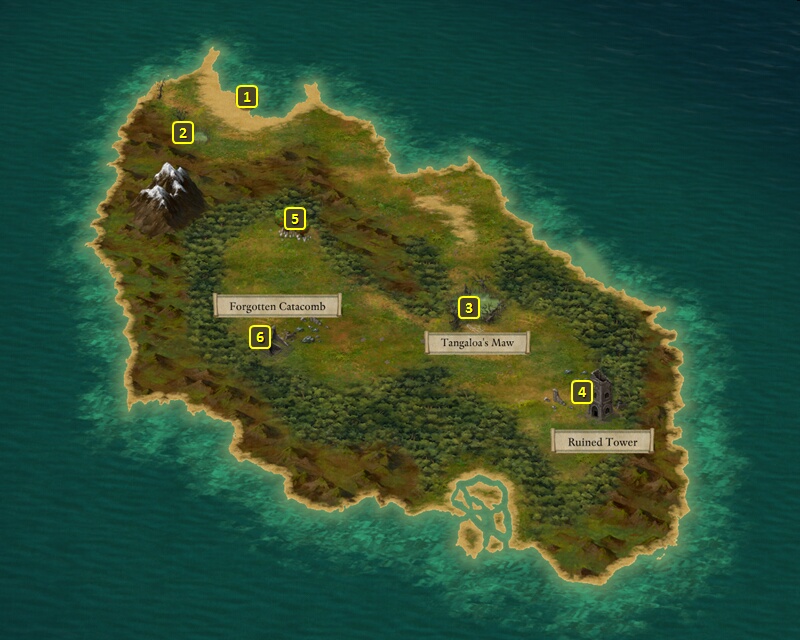
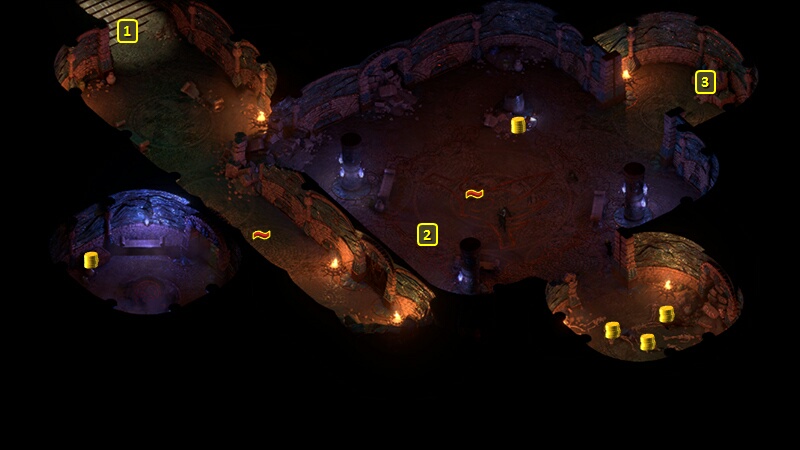
You can land at #1 on the map of the Island. Tangaloa's Maw is at #3,
which involves a scripted interaction to begin with. An Athletics check
of 4 is required at the outset to avoid being turned back. Making the
check brings you into a bog, and 5 hours will elapse.
There will be a path leading out of the bog, but with no indication
where it leads. Choosing to stand your ground, or failing a Survival
check to reach the end of the path, leads to you fighting a lot of
Skeletons and Rotghasts. And you do so in a slog zone that makes moving
around very difficult. And yet this may be the preferable choice if you
wish to keep any resting bonuses you have in place, since standing your
ground won't trigger a Rest.
Making a Survival check of 10 to reach the end of the path will take 4
hours, and a fight with the same undead. One difference is that you'll
be fighting on solid ground instead of a slog zone. The other is that
the 4 hours to reach the end of the path will trigger a Rest, and you'll
lose any resting bonuses you may have had in place.
The undead, in whichever part of the Maw you fight them, will leave
behind a Wardstone of Atrophy,
which can be useful in the nearby Forgotten
Catacomb.
Hordes of undead will be at spots marked #2, which typically include a few
Darguls, along with a Fampyr and a Revenant Ogre.
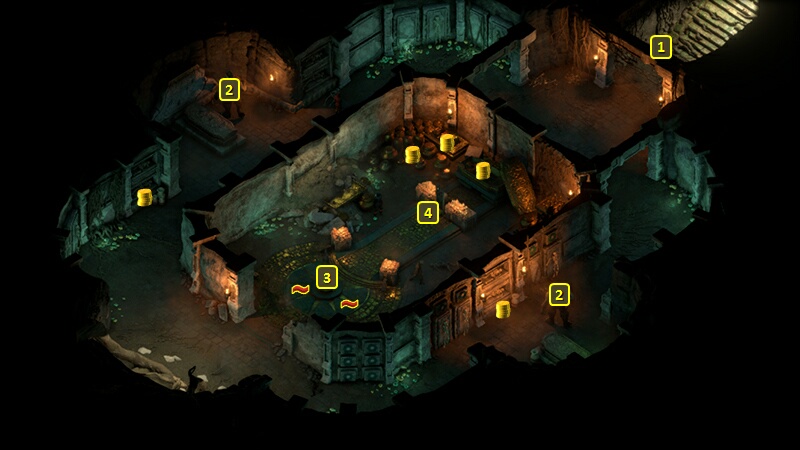
There will be a Sigil of Atrophy at #3, surrounded by a couple of
traps. It can be neutralized by using the Wardstone
of Atrophy on the party beforehand. There will be a Death Guard
Fanatic at #4, who is basically an undead Paladin. He will often leave
the room and join battle when you begin fighting the other undead at
points marked #2. He will leave behind the Reckless
Brigandine should you defeat him.
Leave the Catacomb to complete exploration of one of the three islands
needed for the Quest. You can also rename it to whatever you like.
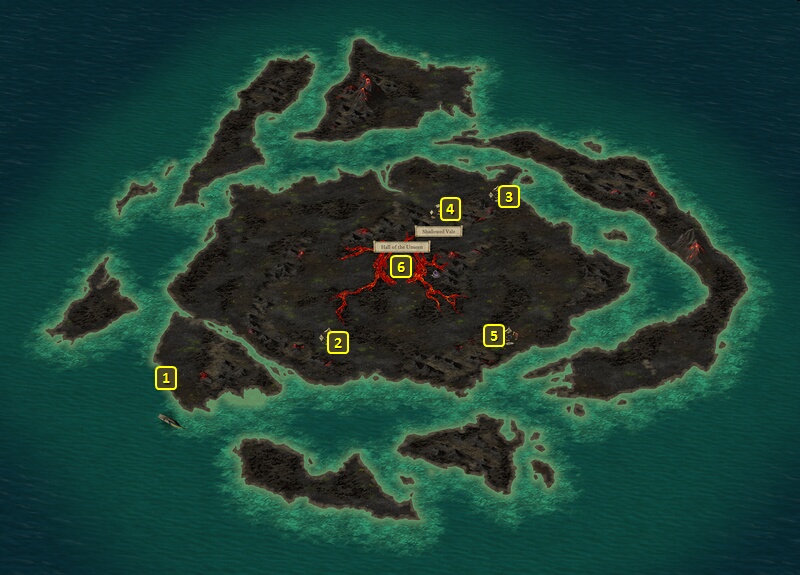
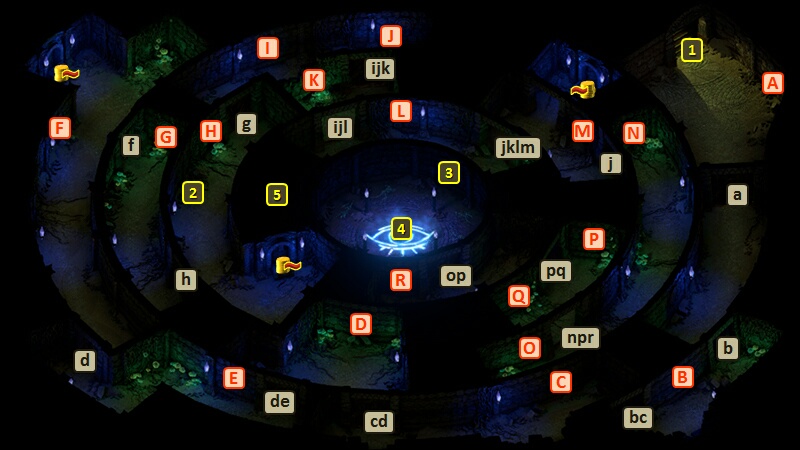
Note that this hall consists of a series of concentric rings, with a
complex network of doors and switches. The capitalized letters signify
switches that open or close doors. The doors they open are marked with
the same letters in lower case. And yes, sometimes a switch can open or
close more than one door.
There will be points where you sometimes have to leave a character
further behind to be able to make progress. For example, you may have to
leave a character behind at the G switch while the rest of the party
makes its way to the H switch. Then you may need to hit the G switch to
open the g door, and then have the party hit the H switch so that the
left behind party can catch up while leaving both the g and h doors
open.
As another example, you may need to leave behind individual characters
at the switches on the north side of the Hall. Have a character hit the
J switch to open the j door towards the northeast corner, and then play
around with the I and K and L switches so that the party can regroup and
still be able to pass through the northeast j door.
*NOTE* Points marked with 'it' signify a trapped and locked chest that
has random items in it.
The switch at #3 will permanently open all the doors in the Hall, but
you'll have to fight several Shades and Spectres afterwards.
Leave the Hall and you'll have completed exploration of another of the
Islands needed for this Quest. You'll also be able to rename it to
whatever you please.
You will have to fight several cultists of Woedica at #2. Several of
them can cast 5th or 6th level spells, so be careful.
A statue at #3 has a Soulbound Mace called the Magistrate's
Cudgel. Obtaining it requires making an Intellect check of 14 and
then a Resolve check of 15 against the statue to pry the weapon from its
grip.
Leave the Temple to complete another island needed for completing the
Quest. You can rename it to whatever you like.
Sorcerer's
Place is a project run entirely by fans and for fans. Maintaining
Sorcerer's Place and a stable environment for all our hosted sites requires a substantial amount of our time and funds on a regular basis, so please consider supporting us to keep the site up & running smoothly. Thank you!
Supporting Sorcerer's Place
Has Sorcerer's Place been useful? If you'd like to show your appreciation
for our hard work on the site, and help us pay the bills the site generates
every month, please consider helping support SP.
Thank you!