The entrance to Sanza's Emporium is at #20 on the map of Queen's
Berth. Getting this Quest requires that you first complete the Mapping
the Archipelago: Tikawara Quest. Now he wants you to find a pair
of islands in the West Wakara Reef.
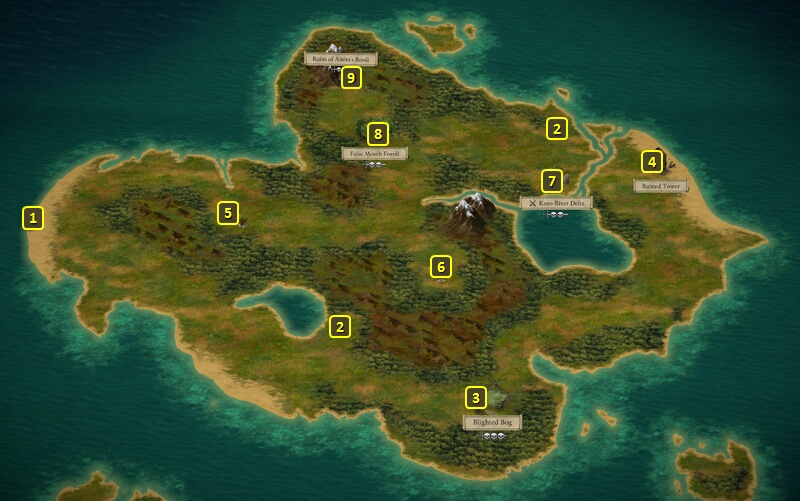
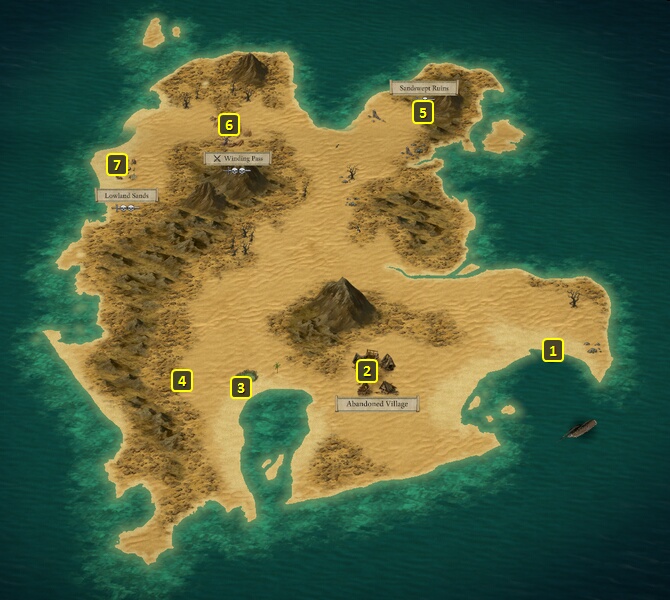
You can land at #1 on the map of the Island. You'll have to get
through the False Mouth Forest at #8, which involves fighting several
Lagufaeth led by a Broodmother.
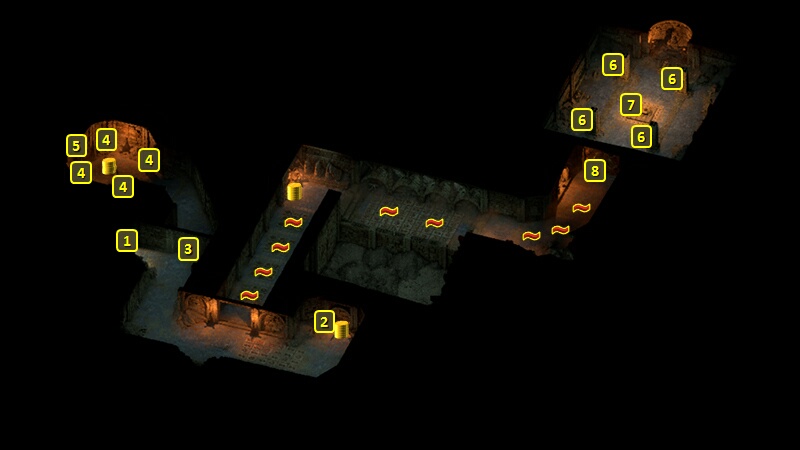
There will be a LOT of traps in here. Points marked 't' often indicate
not single traps, but clusters of traps.
There will be more than one way to go about things.
One way requires someone in the party to have a very good Perception
score, like Maia using a Drug
like Ripple Sponge or Svef.
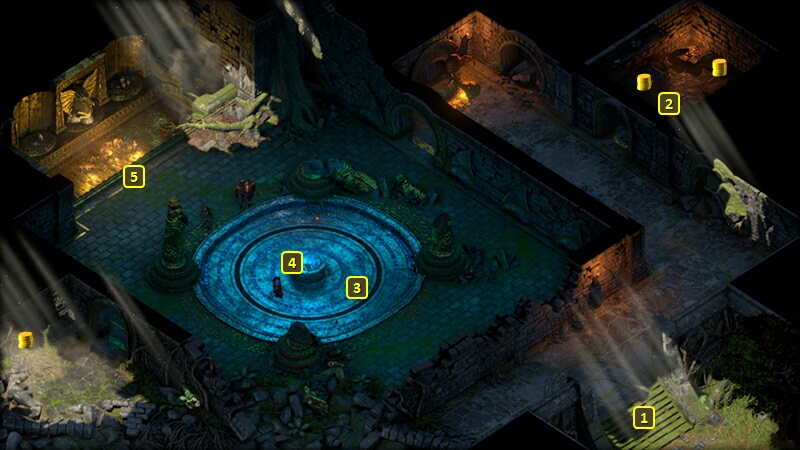
Hit the lever at #2, then go through the door at #3. There will be
Sigils of Death at points marked #4. If you have not previously used a Wardstone of Death on
yourself, you can destroy them at a distance, although they are immune
to Slashing and Piercing Damage. A source of Crushing Damage that can be
used at a distance, like a Scepter,
will work. Spells that can be used outside of combat to inflict
elemental damage (e.g., Fireball) can work too.
The need for a very high Perception check comes in when finding the
hidden switch at #5. It can turn off the flames surrounding the altar at
#7, as well as the sand that threatens to bury anyone in the room should
they try to take the items from the altar.
The alternative way is to go through the door at #8, after disarming
the multitude of traps along the way.
The altar at #7 is surrounded by flames that can cause the Burning Rash
injury (-2 Dexterity, -3 Burning Armor Rating). You can suppress the
flames by using the levers at points marked #6. All four have to be used
at the same time. The easiest way is to position one character besides
each one, pause the game, and command each character to use the level
closest to him or her before unpausing.
Once the flames are suppressed, you can grab a Skull and a War Hammer
called Last Word.
The door at #8 closes, and the room starts to fill with sand (unless you
managed to find and press the button at #5). That prompts a scripted
interaction whereby you must somehow escape through the door at #8.
There's a few possibilities:
You can use a single Immolation
Charge to blow the door away and leave.
You can break the door with three uses (in any combination or
repeated uses) of Concussion
Bombs, Grenades or
Corrosive Damage spells (e.g., Necrotic Lance).
Make a Might check of 13, then a Might check of 15, then either a
Might check of 17 or an Athletics check of 6 to get out of the way
once the door closes. Failing the second Might check results
in the Smashed Hands injury (+20% Recovery Time), while failing the
third check results in the Wrenched Shoulder injury (-3 Might).
You only get 8 actions during the scripted interaction. If you can't
break the door down by then, your party will get buried alive.
Right-click on the Skull and select the option to extract the stone from
it to obtain a Wardstone of
Death. You can then destroy the Sigils of Death at points marked
at #4 at will while immune to their Curse of Mortality power, and grab
any items in the room.
Leaving the Sandswept
Ruins means exploring the other island for purposes of completing
this Quest. You can also rename it to whatever you like.
Sorcerer's
Place is a project run entirely by fans and for fans. Maintaining
Sorcerer's Place and a stable environment for all our hosted sites requires a substantial amount of our time and funds on a regular basis, so please consider supporting us to keep the site up & running smoothly. Thank you!
Supporting Sorcerer's Place
Has Sorcerer's Place been useful? If you'd like to show your appreciation
for our hard work on the site, and help us pay the bills the site generates
every month, please consider helping support SP.
Thank you!